

前言
許多人開發程式時常常忽略架構的重要性,注重 App 的完整性與功能性,但會讓設計開發程式碼凌亂,反而降低開發的效率,及未來維護較為麻煩,架構清楚、層次分明的程式碼,能實現低耦合的模組化,不但程式碼簡潔,也讓自己在開發測試上變得更容易。當然,我們不能為了設計而設計,一個簡單的 App ,卻為了設計而花費更多成本。
開發架構區分多種,每種架構在設計開發上都有好壞,如何適當的時機使用適當的架構,讓開發變得更得心應手,才真正要學習的目標,本篇介紹 Model View Controller (MVC) 已經是一種很廣泛流行的架構模式。
MVC介紹
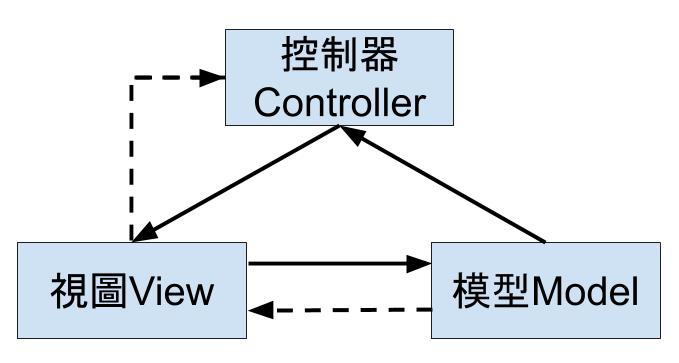
MVC全名Model View Controller,在 MVC的設計理念中, Model 處理數據及邏輯, View 顯示邏輯結果, Controller 擔任兩者的橋樑,轉發請求或對請求進行處理,藉此來分離 Model 與 View ,將邏輯、數據、視圖分開的一種程式碼組成方式,修改介面時無需修改邏輯。
- 模型(Model):程式設計師編寫程式應有的功能,譬如:數據資料的存取、資料庫、網路連線、處理數據...等;Model 不被綁定在 View 或 Controller ,因此還具備重複使用的特質。
- 視圖(View):介面設計人員進行圖形介面設計,譬如:XML佈局文件或程式碼產生。
- 控制器(Controller):負責Model和View的橋樑,轉發請求或對請求進行處理,譬如:Android本身的Activity、Fragment...等。
程式碼
Model程式碼
ListModel.kt
建立Model的資料及需要運算的資料,建立Array List儲存Demo資料,並製作相關操作功能及運算。
class ListModel {
class Demo{
var title:String? = null
var subtitle:String? = null
}
private val mList: MutableList = ArrayList()
fun getData(position:Int):Demo{
return mList[position]
}
fun getCount():Int{
return mList.size
}
fun clear(){
mList.clear()
}
fun addData(title:String, subtitle:String){
val mDemo = Demo()
mDemo.title = title
mDemo.subtitle = subtitle
mList.add(mDemo)
}
fun delData(position:Int){
if(mList.size>0) {
mList.removeAt(position)
}
}
}
View 程式碼
activity_main.xml
建立一個RecyclerView及一個LinearLayout包含兩個Button的View,Button分別為遞增及遞減。
device_item.xml
用於RecyclerView 內部ViewHolder使用,分別為Titler及SubTitle,平行上下兩行文字。
MainActivity.kt
RecyclerView顯示列表、按鈕及操作內容,RecyclerView 預設提供三種 LayoutManager:
- LinearLayoutManager (線性佈局管理器):設定RecyclerView水平或垂直排列,默認為垂直排列。
- GridLayoutManager (網格佈局管理器):設定RecyclerView呈現網格排列。
- StaggeredGridLayoutManager (錯列網格佈局管理器):設定RecyclerView類似瀑布流的排列方式。
class MainActivity : AppCompatActivity() {
private var mAddBtn: Button? = null
private var mRemoveBtn: Button? = null
private var recyclerView: RecyclerView? = null
private val mAdapter = DemoAdapter()
override fun onCreate(savedInstanceState: Bundle?) {
super.onCreate(savedInstanceState)
setContentView(R.layout.activity_main)
mAddBtn = findViewById(R.id.addBtn)
mRemoveBtn = findViewById(R.id.removeBtn)
recyclerView = findViewById(R.id.recyclerView)
recyclerView!!.apply {
layoutManager = LinearLayoutManager(this@MainActivity)
adapter = mAdapter
itemAnimator = DefaultItemAnimator()
}
// 按鈕監聽
mAddBtn!!.setOnClickListener {
// 每次新增一筆資料
mAdapter.addData("MVC", mAdapter.getCount().toString())
}
mRemoveBtn!!.setOnClickListener {
// 每次按下移除最後一筆資料
mAdapter.delData()
}
}
}
Controller 程式碼
DemoAdapter.kt
當需要顯示新創立的ViewHolder或已創建的ViewHolder和數據產生關聯時,就會使用Adapter,在Adapter中通常需要實現三個方法:
- onCreateViewHolder() :當需要新的ViewHolder來顯示列表項時,會調用onCreateViewHolder方法去創建
- onBindViewHolder() :將數據綁定在ViewHolder上,進行Item更新UI數據。
- getItemViewType() :返回總共要顯示的列表的數量。
Adapter則充當著Controller的角色,當Model發生改變的時,調用Adapter的notifyDataSetChanged方法通知數據發生變化,而Adapter調用onBindViewHolder方法重新顯示內容。
class DemoAdapter: RecyclerView.Adapter() {
private val mListModel = ListModel()
override fun onCreateViewHolder(parent: ViewGroup, viewType: Int): ViewHolder {
val view = LayoutInflater.from(parent.context).inflate(
R.layout.device_item, parent, false)
return ViewHolder(view)
}
override fun onBindViewHolder(holder: ViewHolder, position: Int) {
holder.title.text = mListModel.getData(position).title
holder.subtitle.text = mListModel.getData(position).subtitle
}
override fun getItemCount(): Int {
return mListModel.getCount()
}
fun addData(title:String, subtitle:String){
mListModel.addData(title, subtitle)
notifyDataSetChanged()
}
fun delData(){
if(mListModel.getCount()>0) {
mListModel.delData(mListModel.getCount()-1)
notifyDataSetChanged()
}
}
fun getCount(): Int{
return mListModel.getCount()
}
inner class ViewHolder(itemView: View) : RecyclerView.ViewHolder(itemView) {
val title = itemView.findViewById(R.id.title) as TextView
val subtitle = itemView.findViewById(R.id.subtitle) as TextView
}
}
MVC優缺點:
優點:
- 將View和Model分開管理,降低各模組間程式碼相互影響。
- 擴充性提高,且Model能重複使用。
- 職責劃分清楚,利於程式碼後續維護。
缺點:
- Android中Activity當Controller使用,實際上許多UI是由Activity來控制,View與Controller間的過於緊密的連接。
- 由於Activity的職責過大,功能過多程式碼造成迅速膨脹。
- MVC內View跟Model互相作用,無完全分離造成耦合現象。
- 難以進行單元測試
結論
本文中,您學習了如何使用RecyclerView 的MVC架構,讓程式碼看起來簡潔,但需要依照專案做調整,避免過度設計,且隨著不斷的開發,更多的代碼會被放在 Activity內,造成臃腫的現象,造成未來維護困難,所以需要使用額外的設計架構作輔助,未來會介紹MVP及MVVM架構改善問題的產生。
評論