

► 前言
前一篇博文「Python深度學習4:MNIST手寫數字識別模型」介紹一些基本模型訓練方式。疫情已經兩年多了,許多地方都可以看到AI標記用戶是否佩戴口罩,因此我們就來介紹一下如何訓練口罩辨識模型,本篇使用MobileNet-SSD (Single Shot MultiBox Detector, SSD)演算法,能在手機或樹莓派上運行順暢,本篇博文使用現成資料集,進行模型訓練教學。
► TensorFlow GPU環境建置
本篇博文採用TensorFlow1.15版本作為模型訓練框架進行深度學習,搭配Nvidia Geforce GTX 3080顯示卡提升訓練速度。TensorFlow GPU訓練環境建置需具備以下基礎配置。
- Ubuntu 18.04 LTS
- Nvidia GPU顯卡 (Cuda 架構需5版本以上) Cuda版本查詢
- Nvidia GPU顯卡驅動
►Cuda 與cudnn安裝
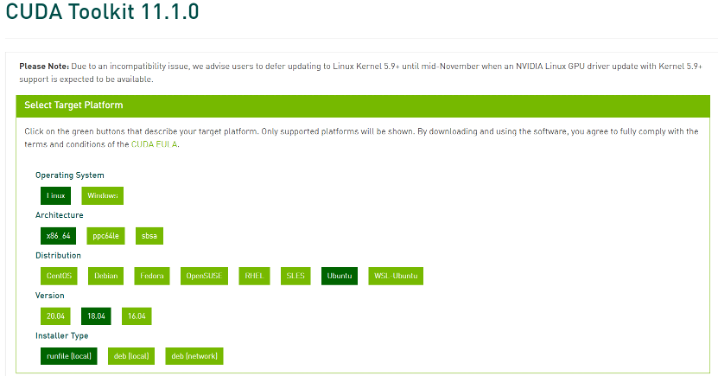
Cuda為Nvidia所推出GPU平行運算框架,透過Cuda架構使進行複雜的計算問題。Cudnn為基於Cuda的深度學習GPU加速函式庫。首先下載需要版本的CUDA版本,本流程顯卡為Geforce GTX 3080使用Cuda 11.1作為後續應用。
Cuda安裝(如下圖所示)
Cuda下載位置 https://developer.nvidia.com/cuda-toolkit-archive
進入下載Cuda所存放的資料夾,使用Terminal執行腳本
$ sudo sh ./cuda_11.1.0_455.23.05_linux.run添加環境變數,Terminal bashrc,檔案最後添加以下內容,紅字部分對應所安裝cuda版本進行改動,根據顯卡需求採用cuda11.1作為範例
$ sudo gedit ~/.bashrc
export PATH=/usr/local/cuda-11.1/bin:$PATH
export LD_LIBRARY_PATH=/usr/local/cuda-11.1/lib64:$LD_LIBRARY_PATH
$ source ~/.bashrc重啟系統,Terminal輸入nvcc -V出現以下資訊即安裝成功
$ reboot
$ nvcc -V

      nvcc: NVIDIA (R) Cuda compiler driver

      Copyright (c) 2005-2020 NVIDIA Corporation

      Built on Tue_Sep_15_19:10:02_PDT_2020

      Cuda compilation tools, release 11.1, V11.1.74

      Build cuda_11.1.TC455_06.29069683_0
Cudnn 安裝(如下圖所示)
Cudnn下載位置 https://developer.nvidia.com/rdp/cudnn-archive
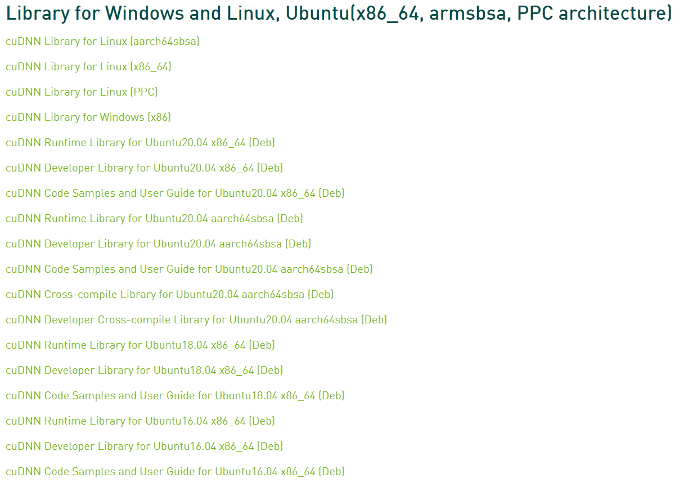
下載cuDNN Library for Linux (x86_64),並解壓縮。
$ tar -xzf cudnn-11.1-linux-x64-v7.6.5.32.tgz
進入 cuda 資料夾
$ cd cuda
將檔案複製到 /usr/local/cuda
$ sudo cp lib64/lib* /usr/local/cuda/lib64/
$ sudo cp include/cudnn.h /usr/local/cuda/include/
$ sudo chmod a+r /usr/local/cuda/include/cudnn*.h /usr/local/cuda/lib64/libcudnn*
►TensorFlow 環境配置
使用tensorflow object detection api 的方式進行模型訓練,並使用Mobilenet-SSD 作為預訓練權重。
相關內容網址可以參考以下連結
https://tensorflow-object-detection-api-tutorial.readthedocs.io/en/tensorflow-1.14/
訓練環境建置:
- Ubuntu 18.04 LTS
- Anaconda 4.11.0
- Python 3.6.13
- TensorFlow-gpu 1.15.4
- OpenCV 4.5.4
TensorFlow訓練環境建置
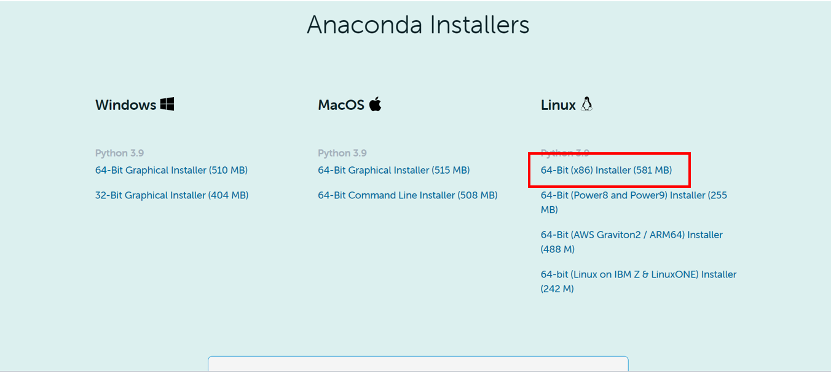
Anaconda於下方連結進行下載,下載版本如下圖所示。
https://www.anaconda.com/products/individual
執行Anaconda安裝腳本,本文安裝位置為 /usr/local/anaconda3
$./Anaconda3-2021.11-Linux-x86_64.sh
通過conda 指令建立python3.6虛擬環境與啟動虛擬環境
$ conda create --name py36 python=3.6
$ conda activate py3.6
並於虛擬環境下進行套件安裝
$ conda install opencv-python
$ pip install nvidia-pyindex
$ pip install nvidia-tensorflow
透過以下網址至tensorflow提供的object detection api網址
https://github.com/tensorflow/models/tree/master
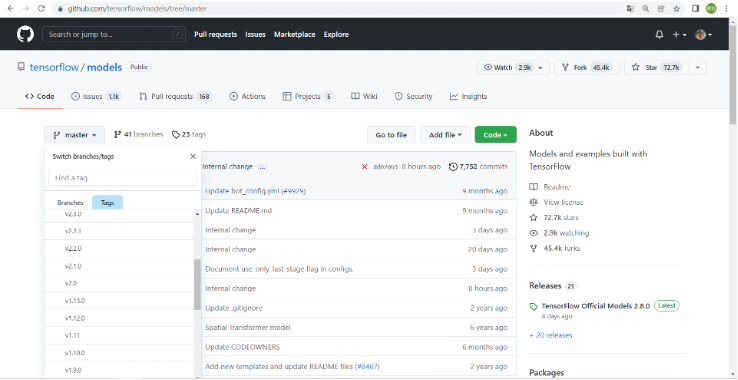
本篇採用tensorflow objection detection api v1.13.0版本作為後續訓練應用。透過下方示意圖切換版本至v 1.13.0後進行下載。
$ git clone https://github.com/tensorflow/models.git或是直接採用下方連結v1.13.0版本,進行下載
https://github.com/tensorflow/models/tree/v1.13.0
Tensorflow object detection api使用protobuf來進行模型配置與訓練參數,所以需要安裝protobuf
$ sudo apt install protobuf-compiler並將models和Tensorflow slim 加入python環境變數
$ gedut ~/.bashrc
export PYTHONPATH=$PYTHONPATH: tfmodels/models/research:tfmodels/models/research/slim
$ source ~/.bashrc
進入剛剛所下載的資料夾進行檔案安裝
$ cd tfmodels/models/research
$ sudo python3 setup.py build
$ sudo python3 setup.py install
►Mobilenet-SSD 訓練資料建置
進入以下路徑,並新增ssd_model資料夾
$ cd tfmodels/models/research/object_detection
$ mkdir ssd_model
使用口罩資料集進行訓練,內部使用格式為PASCAL VOC。
口罩資料集下載連結:
https://www.kaggle.com/andrewmvd/face-mask-detection,
將下載的資料集存放至ssd_model資料夾內並解壓縮,將Rename.py、CreateImageSets.py與xml_to_tfrecord.py放置於ssd_model資料夾。
$ unzip archive.zip
執行Rename.py此程式會將xml與圖片副檔名png改動為jpg,再執行CreateImageSets.py產生數據集VOC2007格式(Annotations、JPEGImages、ImageSets)。
修改xml_to_tfrecord.py內的VOC_LABELS參數,執行xml_to_tfrecord.py程式會把xml檔為tfrecord格式,之後用於訓練,如下圖所示。
VOC_LABELS

dataset_dir/output_dir
dataset_dir = "/models/research/object_detection/ssd_model/Mask_dataset/"
output_dir = "/models/research/object_detection/ssd_model/Mask_dataset/"
$ python xml_to_tfrecord.py
並於ssd_model 建立label_map.pbtxt新增訓練資料類別,如下圖所示
$ gedit label_map.pbtxt

item {
    id: 1
    name: 'with_mask'
}


item {
    id: 2
    name: 'without_mask'
}


item {
    id: 3
    name: 'mask_weared_incorrect'
}
►Mobilenet-SSD模型訓練
於下方連結,下載Mobilenet SSD 作為預訓練權重進行訓練,如下圖所示。
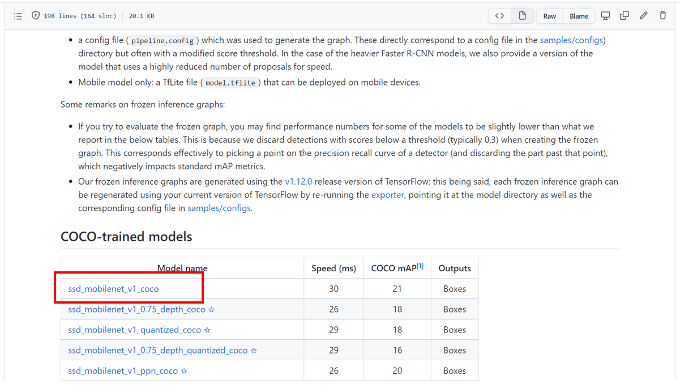
將下載檔案移至ssd_model資料夾,並解壓縮
$ mv ssd_mobilenet_v1_coco_11_06_2017.tar.gz tfmodels/models/research/object_detection/ssd_model
$ cd tfmodels/models/research/object_detection/ssd_model
$ tar xvf ssd_mobilenet_v1_coco_11_06_2017.tar.gz
修改ssd_mobilenet_v1_coco.config訓練參數配置
- num_classes:訓練模型目標檢測類別數量
- decay_steps:每訓練decay_steps降低學習率一次
- fine_tune_checkpoint: 載入預訓練模型路徑
- from_detection_checkpoint: true類別載入加載detection模型參數中FeatureExtractor部分,flase只載入classification模型參數
- num_steps: 20000 總迭代次數
- input_path: 讀取tfrecord檔案路徑
- label_map_path: 讀取pbtxt文件路徑
- num_examples:驗證集的資料數目
修改ssd_mobilenet_v1_coco.config文件後即可模型訓練,移動路徑至object_detection資料夾進行模型訓練,執行model_main.py進行訓練
$ cd tfmodels/models/research/object_detection
$ python model_main.py --model_dir=training --pipeline_config_path=./ssd_model/ssd_mobilenet_v1_coco.config --num_train_steps=60000 --num_eval_steps=20 –alsologtostderr
訓練模型產生於object_detection/train資料夾下,如下圖所示。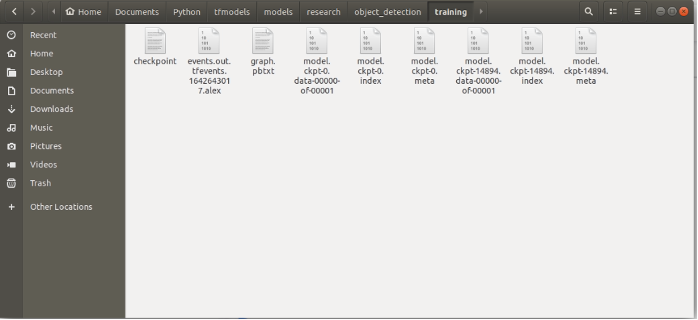
►凍結Mobilenet-SSD訓練模型
移動至object_detection資料夾,執行export_inference_graph.py進行模型凍結,將.pb模型參數和網路結構進行固化,指令如下:
$ cd tfmodels/models/research/object_detection
$ python export_inference_graph.py \
    --input_type image_tensor \
    --pipeline_config_path ./ssd_model/ssd_mobilenet_v1_coco.config \
    --trained_checkpoint_prefix ./training/model.ckpt-60000 \
    --output_directory ./ssd_model/ssd_mobilenet_v1_coco_11_06_2017/model/
所產生的凍結模型(frozen_inference_graph.pb),如下圖所示。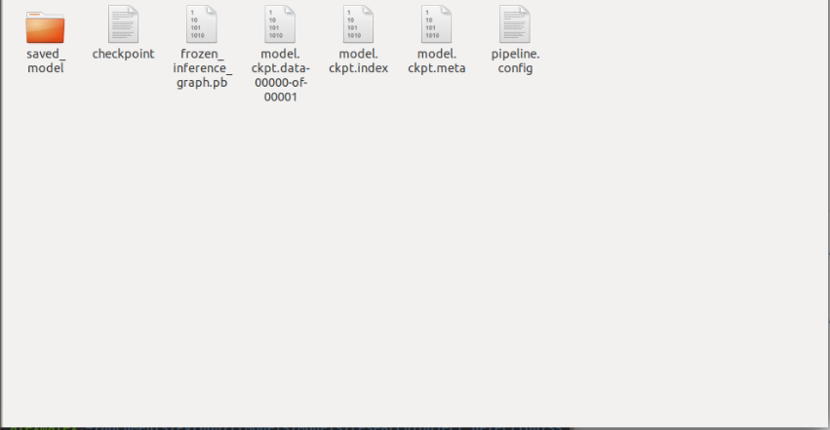
►驗證結果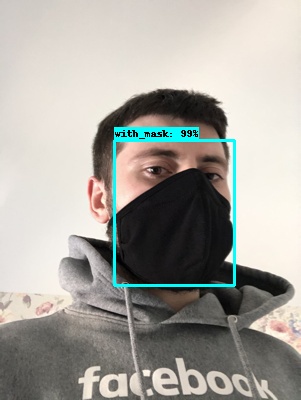
►小結
透過以上範例講解,能夠建立一個口罩辨識模型,凍結完成的frozen_inference_graph.pb模型,還可以轉換為TensorFlow Lite 模型,下一篇會介紹轉換tflite模型後使用Android手機執行,本篇博文到這裡,期待下一篇博文吧!
評論