一. 概述
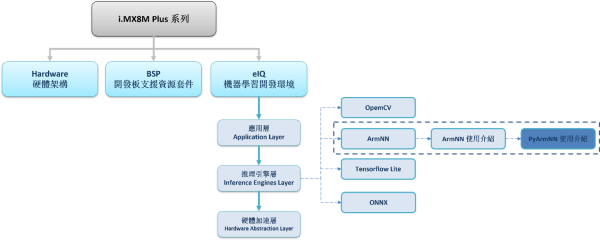
此篇文章為 eIQ 系列的延伸介紹,相信各位對 NXP 所開發的 eIQ 機器學習開發環境 有一定程度上的認識了 !! 這裡將介紹 eIQ 之中的一個神經網路框架,或稱機器學習框架( Machine Learning Framework)。 後續將帶領各位如何在 PyArmNN 的框架上,使用不同的硬體處理器( CPU 或 NPU 的切換 ) !! 如下圖文章架構圖所示,此架構圖隸屬於 i.MX8M Plus 的方案博文中,並屬於機器學習內的推理引擎(Inference Engine) 的 ArmNN 部分,目前章節介紹 “PyArmNN 使用介紹”。
若新讀者欲理解更多人工智慧、機器學習以及深度學習的資訊,可點選查閱下方博文
大大通精彩博文 【ATU Book-i.MX8系列】博文索引

ArmNN 系列博文-文章架構示意圖
二. PyArmNN 介紹
目前版本 : Arm NN 26.0.0
ArmNN 是一套開源的機器學習推理引擎框架,由 ARM 與 Linaro 主導開發的人工智能計畫,能夠提供用戶更簡單、輕鬆、快速的機器學習體驗。特別的是 ArmNN 並非有自己的推理引擎,而是可以運行多種深度學習模組框架的 推理引擎(inference engine) 或 委託器(delegates) ,像是 Caffe, TensorFlow, TensorFlow Lite, 以及 ONNX 。 除此之外,亦提供 CPU / GPU/ NPU 等硬體加速資源,並可以搭配 C++ 或 Python 語言進行推理 !! 而運用 Python 語言實現,則稱作 “ PyArmNN” 。
ArmNN 後端推理框架圖
如下圖所示,首先由各家模組 解譯(parser) 完成後,將託付給 Graph builder 與 Runtime optimizer 至各硬體設備進行優化,而後續則有三種處理方式 ; 第一種左側路線,就是純 CPU 的運算。第二種就是中間路線,利用 ARM Compute Library 與 ARM Neon 核心作多線程優化進行推理。而第三種則是右側路線,委託給神經網路推理引擎(NNRT),並透過 OVXLIB 與 OpenVX driver 來啟動 GPU 或 NPU 進行硬體加速來完成推理!!

ArmNN 後端推理框架圖
資料來源 : 官方網站
1. 官方範例 - 物件分類( Image Classification ) :
範例之使用方式 :
$ cd /usr/bin/armnn-21.08/pyarmnn/image_classification/
$ python3 tflite_mobilenetv1_quantized.py
運行結果 :
成功識別出虎紋貓(tabby),機率約 99 %


2. 官方範例 - 物件偵測( Object Detection ) :
範例之使用方式 :
須先行下載測試標籤、模組並將其傳入至開發板中後,運行下方 Python 代碼。
$ cd /usr/bin/armnn-21.08/pyarmnn/object_detection/
$ python3 run_video_stream.py --video_source 3 --model_file_path detect.tflite \
  --model_name ssd_mobilenet_v1 --label_path coco_labels.txt --preferred_backends ‘CpuRef’
運行結果 :
成功啟用鏡頭並偵測至物件。但可惜的是此範例暫無法使用 VsiNpu進行推理。

3. 自行建置 - 物件分類 (Image Classification using TensorFlow Lite) :
須先行下載測試圖片、標籤、模組並將其傳入至開發板中後,運行下方 Python 代碼。
import cv2
import time
import numpy as np
import pyarmnn as ann
# --------------------------------------------------------------------------------------------------------------
# API
# --------------------------------------------------------------------------------------------------------------
def load_labels(path):
with open(path, 'r') as f:
return {i: line.strip() for i, line in enumerate(f.readlines())}]
# --------------------------------------------------------------------------------------------------------------
# Main
# --------------------------------------------------------------------------------------------------------------
# 載入標籤
labels = load_labels("labels_mobilenet_quant_v1_224.txt")
# 載入模組資訊
parser = ann.ITfLiteParser()
network = parser.CreateNetworkFromBinaryFile('mobilenet_v1_1.0_224_quant.tflite')
# 設置輸入端資訊
input_binding_info = parser.GetNetworkInputBindingInfo(0, 'input')
# 創建運行對象
options = ann.CreationOptions()
runtime = ann.IRuntime(options)
preferredBackends = [ann.BackendId('VsiNpu'), ann.BackendId('CpuAcc'), ann.BackendId('CpuRef')]
opt_network,messages=ann.Optimize(network,preferredBackends,runtime.GetDeviceSpec(),nn.OptimizerOptions())
# 載入模組之最佳化網路.
net_id, _ = runtime.LoadNetwork(opt_network)
# 載入圖片並設置於解譯器
frame = cv2.imread('dog.bmp')
frame_rgb = cv2.cvtColor(frame, cv2.COLOR_BGR2RGB)
frame_resized = cv2.resize(frame_rgb, (224, 224))
input_tensors = ann.make_input_tensors([input_binding_info], [frame_resized]) # img [MXNX4]
# 設置輸出端資訊
outputs_binding_info = parser.GetNetworkOutputBindingInfo(0, 'MobilenetV1/Predictions/Reshape_1')
output_tensors = ann.make_output_tensors([outputs_binding_info])
# 解譯器進行推理(暖開機)
runtime.EnqueueWorkload(0, input_tensors, output_tensors)
# 解譯器進行推理
interpreter_time_start = time.time()
runtime.EnqueueWorkload(0, input_tensors, output_tensors)
interpreter_time_end = time.time()
print( "ArmNN_ImageClassification" + " Inference Time = ", (interpreter_time_end - interpreter_time_start)*1000 , " ms" )
# 處理輸出資料
results = ann.workload_tensors_to_ndarray(output_tensors)
results = np.array(results)
results = np.squeeze(results)
results_indx = np.where(results==np.max(results))
print("The max possible classes is", labels[results_indx[0][0]], "( probability =", results[results_indx[0][0]]/255, ")", )
print("done!")
運行結果 :
成功識別為 比利時牧羊犬(Malinois) 機率為 76 %


三. PyArmNN 應用技巧
1. 如何使用不同的 代理器(delegate) 進行推理 :
如下 Python 代碼,設定成新的解譯器(Interpreter)。
preferredBackends = [ann.BackendId('VsiNpu'), ann.BackendId('CpuAcc'), ann.BackendId('CpuRef')]
opt_network,messages = ann.Optimize(network,preferredBackends,runtime.GetDeviceSpec(),nn.OptimizerOptions())
2. 如何運用不同的模組格式於 PyArmNN 進行推理 :
很可惜,目前 PyArmNN 僅支持 TensorFlow Lite 的模組格式。後續版本將會 Release 關於 ONNX 的應用 !! 敬請期待 ~
四. 結語
上述已經介紹了 PyArmNN 的使用方式,藉此可以選擇 TensorFlow 或是 ONNX 的神經網路框架進行推理。並可任意使用至 CPU / GPU / NPU 等加速運算晶片。在量化後的 MobileNet 最快可達到每幀 3ms 的推理速度 !! 其效能是與 C 語言的 ArmNN 相近。同樣的,目前 ONNX 與硬體間的描述仍存在一些問題,故目前無法使用 !! 請持續關注後續的版本更新 !! 謝謝。
五. 參考文件
[1] 官方文件 - i.MX Machine Learning User's Guide
[2] 官方文件 - i.MX Yocto Project User's Guide.pdf
[3] 官方文件 - Arm NN Developer Guide
[4] 官方文件 - PyArmNN Github
如有任何相關 ArmNN 技術問題,歡迎至博文底下留言提問 !!
接下來還會分享更多 ArmNN 的技術文章 !!敬請期待 【ATU Book-i.MX8 系列 - ArmNN】 !!
