

以下的步驟說明了如何修改power table來調整和修改藍牙發射功率,所搭配的軟體工具是高通Bluesuite 3.3.3以後的版本。
首先點選並執行高通Bluetest3測試工具。
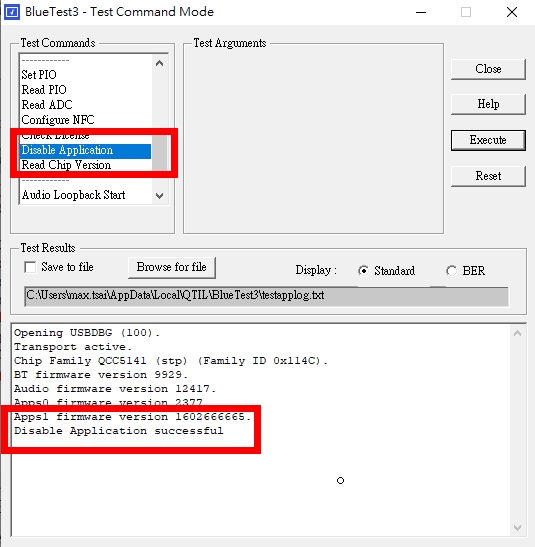
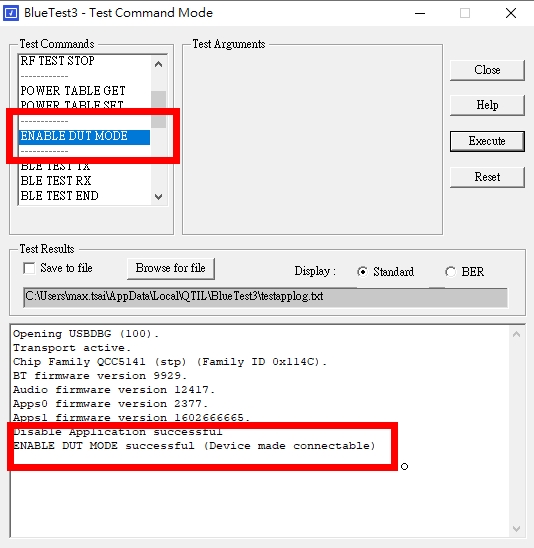
在執行測試前,先點選 "Disable Application” 和"ENABLE DUT MODE”這兩個指令。
我們接下來要開始調整輸出功率。
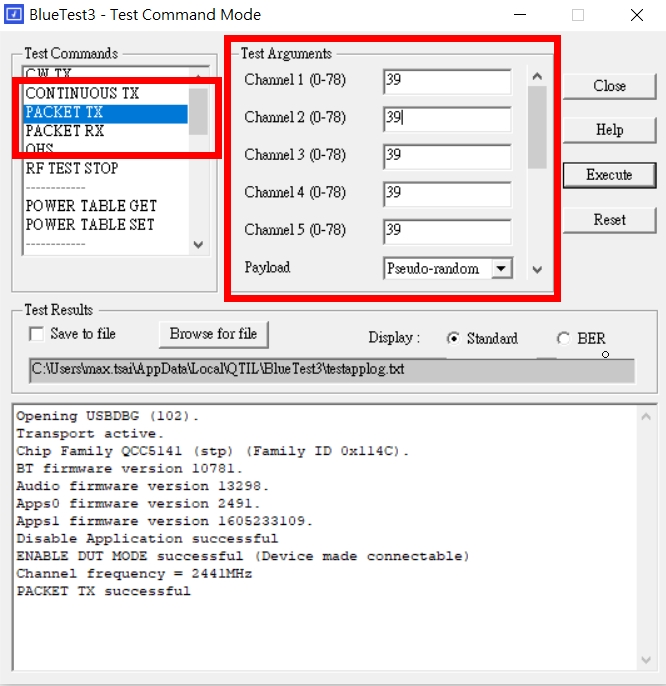
首先點選 PACKET TX
以下的操作步驟以 BR power ,Power Table Entry Level 6 來調整參數發射設定
■ Channel n: 39 (設定五欄都是channel 39)
■ Payload: Pseudo-random
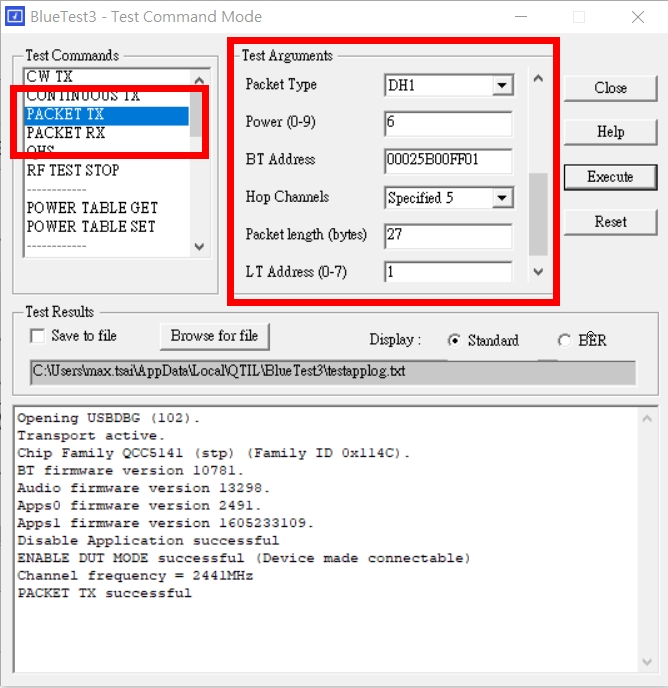
■ Packet type: DH1
■ Power: 6
■ BT address: Default 00025B00FF01
■ Hop channels: Specified 5
■ Packet length: 27 (對應Basic Rate DH1)
■ LT address: 1
設定完之後按執行
接著再點選POWER TABLE SET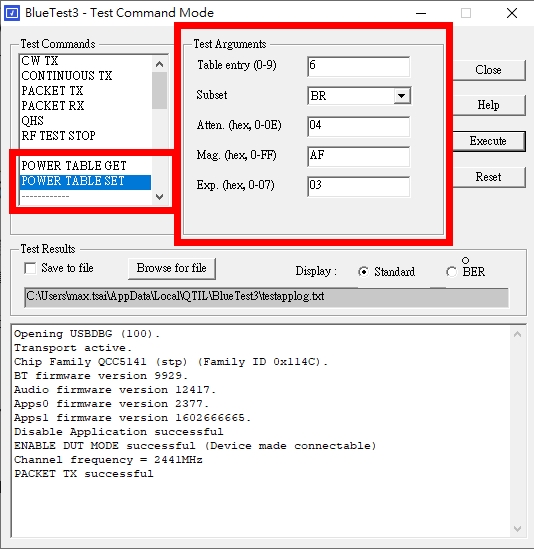
每一個Power table entry是由 Digital (Magnitude and Exponent) 和Analog (Attenuation) gain設定所組成。
Digital Gain的方程式如下: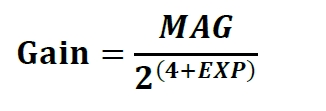
為了防止信號被削波,Digital gain有以下的限制
■ EDR – 計算出來的Digital gain <2.15 dB
■ BR – 計算出來的Digital gain < 5.35 dB
Analog Gain:
Attenuation 可以設定0~15
■ 0 是 enables all PA segments
■ 14 是enables a single segment
■ 15 是disables all PA segments resulting in no radio frequency (RF) output
Attenuation 的值要小於10以避免EVM or ACP 測試失敗。
回到Power Table Set Test Arguments裡面的設定值
Table entry相對應剛才PACKET TX的POWER Level 6
Subset 選擇BR
調整要量測藍牙規格選擇相對應的調變,改變Digital (Magnitude and Exponent) 和Analog (Attenuation) gain之後按"Execute”
接下來再用藍牙測試儀去量測即可。
量測TX Output Power 可以參考: 成為藍芽RF調測高手系列博文。
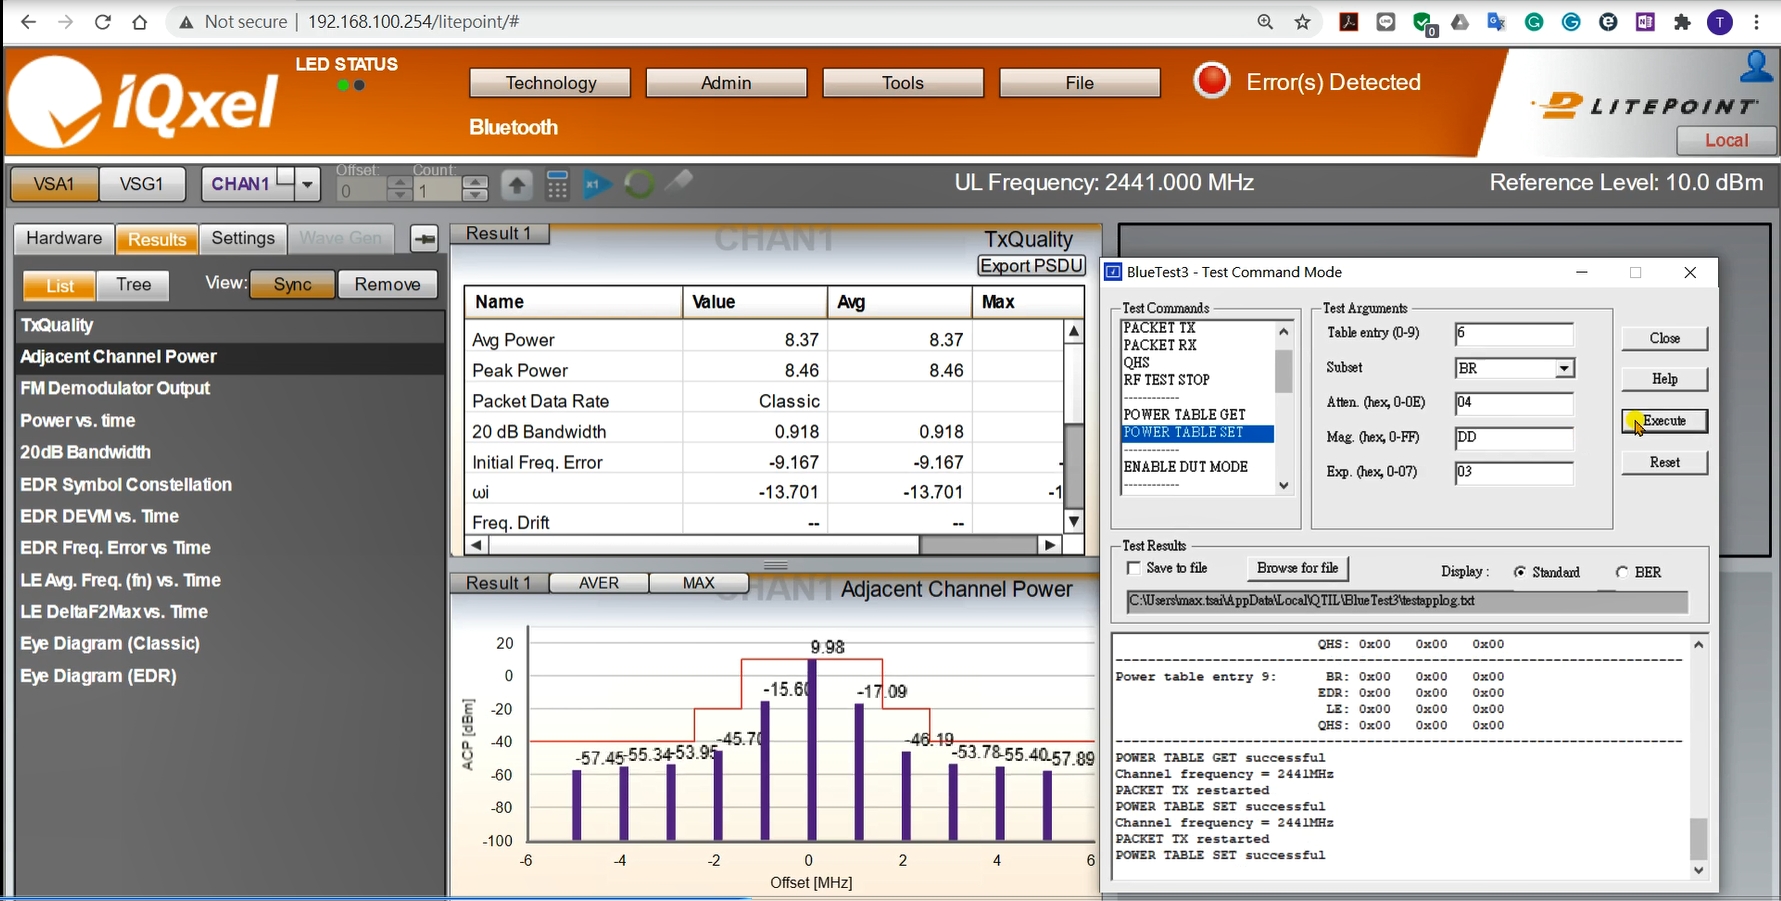
修改Mag.從 0xAF 變成 0xDD 可以看到輸出功率也同的從Avg. Power 6.34dBm變成8.37dBm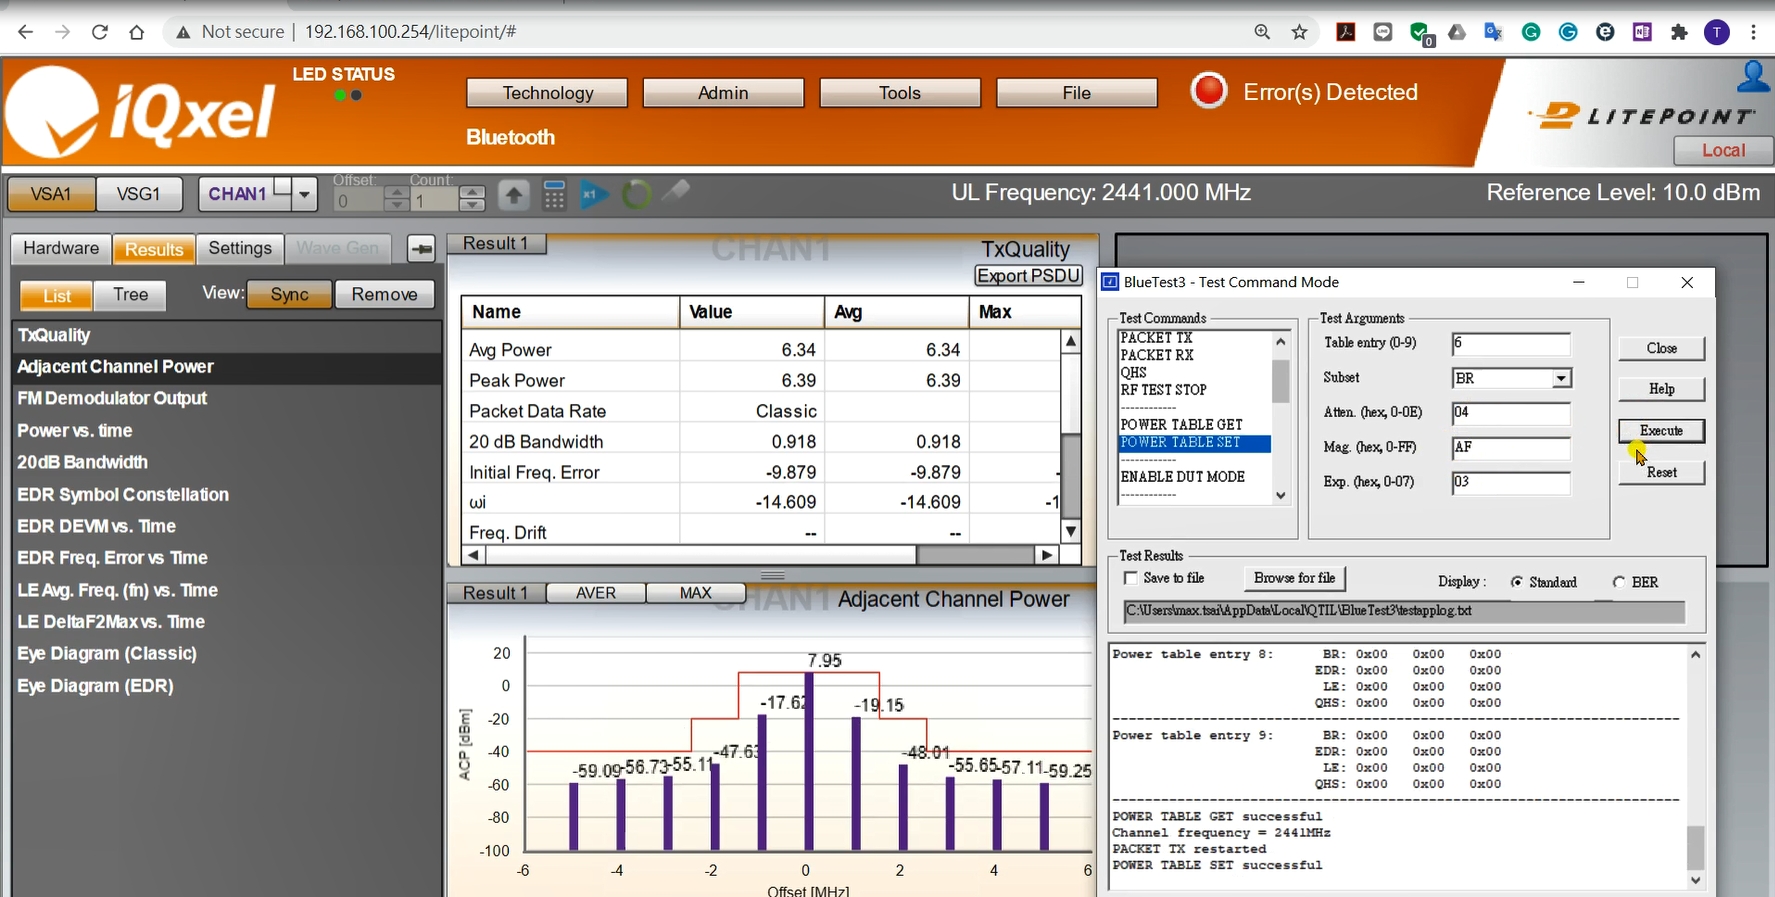
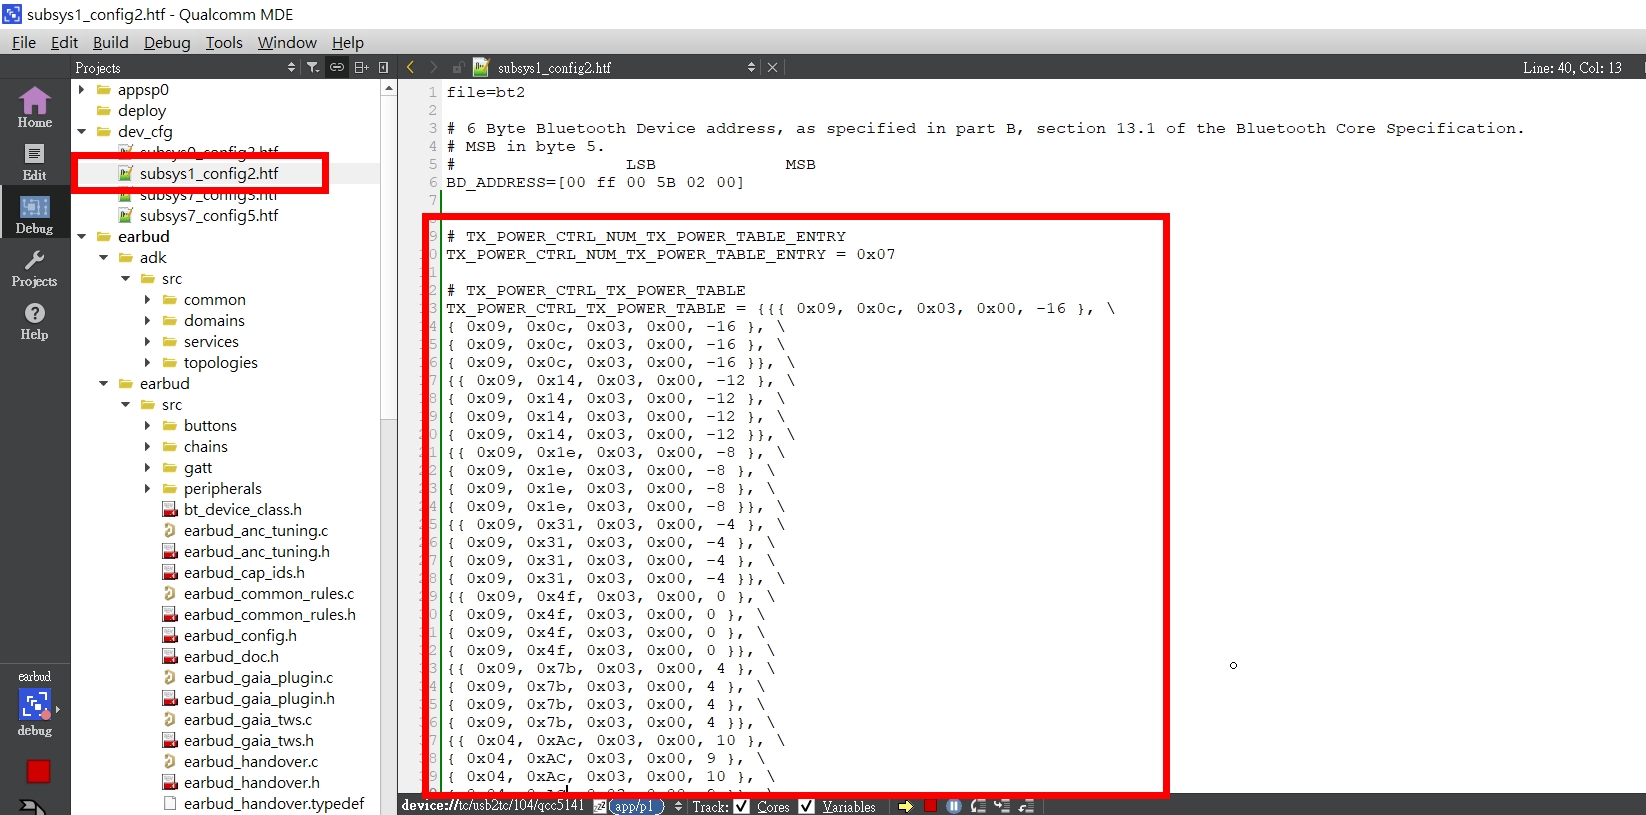
修改要調整的Power Table 的值之後,找到MDE裡面Bluetooth subsystem configuration files prefixed subsys1_的htf檔。如下圖找到subsys1_config2.htf
針對藍牙Class 1的產品都要測試Power Table, 每一階的輸出功率要符合藍牙的規範
Step size of the power control: 2dB =< step size =< 8 dB
For power class 1 equipment: - At minimum power step: PAV < 4dBm
設定完每一階要修改的值之後
加入以下的設定
# TX_POWER_CTRL_NUM_TX_POWER_TABLE_ENTRY

TX_POWER_CTRL_NUM_TX_POWER_TABLE_ENTRY = 0x07


# TX_POWER_CTRL_TX_POWER_TABLE

TX_POWER_CTRL_TX_POWER_TABLE ={{{ 0x09, 0x0c, 0x03, 0x00, -16 }, \

{ 0x09, 0x0c, 0x03, 0x00, -16 }, \

{ 0x09, 0x0c, 0x03, 0x00, -16 }, \

{ 0x09, 0x0c, 0x03, 0x00, -16 }}, \

{{ 0x09, 0x14, 0x03, 0x00, -12 }, \

{ 0x09, 0x14, 0x03, 0x00, -12 }, \

{ 0x09, 0x14, 0x03, 0x00, -12 }, \

{ 0x09, 0x14, 0x03, 0x00, -12 }}, \

{{ 0x09, 0x1e, 0x03, 0x00, -8 }, \

{ 0x09, 0x1e, 0x03, 0x00, -8 }, \

{ 0x09, 0x1e, 0x03, 0x00, -8 }, \

{ 0x09, 0x1e, 0x03, 0x00, -8 }}, \

{{ 0x09, 0x31, 0x03, 0x00, -4 }, \

{ 0x09, 0x31, 0x03, 0x00, -4 }, \

{ 0x09, 0x31, 0x03, 0x00, -4 }, \

{ 0x09, 0x31, 0x03, 0x00, -4 }}, \

{{ 0x09, 0x4f, 0x03, 0x00, 0 }, \

{ 0x09, 0x4f, 0x03, 0x00, 0 }, \

{ 0x09, 0x4f, 0x03, 0x00, 0 }, \

{ 0x09, 0x4f, 0x03, 0x00, 0 }}, \

{{ 0x09, 0x7b, 0x03, 0x00, 4 }, \

{ 0x09, 0x7b, 0x03, 0x00, 4 }, \

{ 0x09, 0x7b, 0x03, 0x00, 4 }, \

{ 0x09, 0x7b, 0x03, 0x00, 4 }}, \

{{ 0x04, 0xAc, 0x03, 0x00, 10 }, \

{ 0x04, 0x93, 0x03, 0x00, 9 }, \

{ 0x04, 0xAc, 0x03, 0x00, 10 }, \

{ 0x04, 0x93, 0x03, 0x00, 9 }}, \

{{ 0x00, 0x00, 0x00, 0x00, 0 }, \

{ 0x00, 0x00, 0x00, 0x00, 0 }, \

{ 0x00, 0x00, 0x00, 0x00, 0 }, \

{ 0x00, 0x00, 0x00, 0x00, 0 }}, \

{{ 0x00, 0x00, 0x00, 0x00, 0 }, \

{ 0x00, 0x00, 0x00, 0x00, 0 }, \

{ 0x00, 0x00, 0x00, 0x00, 0 }, \

{ 0x00, 0x00, 0x00, 0x00, 0 }}, \

{{ 0x00, 0x00, 0x00, 0x00, 0 }, \

{ 0x00, 0x00, 0x00, 0x00, 0 }, \

{ 0x00, 0x00, 0x00, 0x00, 0 }, \

{ 0x00, 0x00, 0x00, 0x00, 0 }}}
存檔,再MDE環境執行以下的步驟就可以完成POWER TABLE修改
- Select the Edit or Debug view.
- Right-click the fw_cfg project.
- Select Deploy (Skip Dependencies)
評論
Mark
2021年12月29日
Herman.Liang
2021年3月16日
游子
2020年12月4日
Charles Yu
2020年12月1日