

一、概述
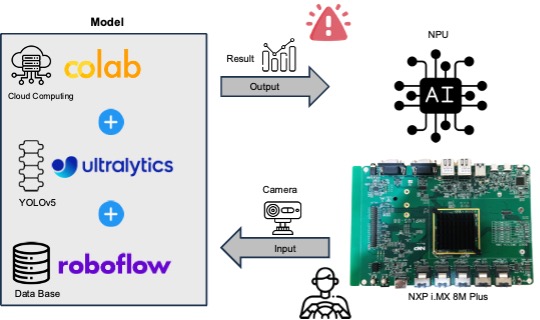
在當今這個人工智能全面崛起的時代,電腦視覺(Computer Vision) 領域經歷了一場劃時代的變革。過去,我們依賴逐像素的處理技術來解析圖像,但現在,這一切都被大數據驅動的 深度學習(Deep Learning) 所取代。這種方法利用龐大的數據集來訓練所謂的「模組(Model)」,從而實現更為精準和高效的圖像識別。而在這波浪潮中,生成式( Generative AI ) 人工智能 和ChatGPT等技術的出現,更是顛覆了我們對於人工智能的想像,智能化的設備不再是遙不可及的夢想,而是觸手可及的現實。尤其搭配 NXP i.MX8M Plus 平台,使得邊緣運算 (Edge Computing) 結合物件識別 YOLO 算法更加高效和普及。
在這樣的背景下,YOLO(You Only Look Once)技術應運而生,它是一種革命性的物件檢測技術,能夠在單次掃描圖像的過程中同時識別多個物件,極大地提升了處理速度與準確率。YOLO的應用場景極為廣泛,從自動駕駛到安全監控系統,都能見到它的身影。過去,學者和工程師們耗費無數心血研發的複雜系統,如今 ultralytics 社群的加持下,即可透過一些簡單的步驟輕鬆實現。
當 YOLO 物件識別(object detection) 與NXP i.MX8M Plus平台結合時,並搭配內建的神經網路處理器(Neural Processing Unit, NPU)。即可為AI 識別帶來了前所未有的效率和便捷性。這意味著,終端產品可以在不依賴雲端的情況下,即時處理和反應運算結果,真正做到了在數據產生的源頭就進行智能處理。即 邊緣運算(Edge Computing) 的概念得以完美實踐 !!
開發平台的第一步就是如何建立 NXP 嵌入式系統的開發環境, 若不懂此技術的讀者可以閱讀此 【ATU Book - i.MX8系列 - OS】NXP i.MX Linux BSP 開發環境架設】 來快速佈署恩智浦 NXP i.MX8 系列的開發環境,透過此博文或 ATU 一部小編的 NXP i.MX 系列博文,即可輕鬆實現任何有關 i.MX8 的環境架設 !! 或是想要更快速進入到 NXP 平台的實作中,可以至官方網站下載官方發行的 Linux 映像檔(Image)。
Embedded Linux for i.MX Applications Processors | NXP Semiconductors
疲勞駕駛監控系統 (DMS) - 軟體架構示意圖
然而,本篇文章將以 Google 的 Colab 雲端運算為訓練平台,並搭配 ultralytics 的 YOLOv5 框架與 Roboflow 提供的資料庫( DataBase ) 來快速建置一套 疲勞駕駛監控系統 (DMS) 來監視駕駛者是否呈現瞌睡狀態 !! 並以 NXP i.MX8M Plus 作為最終的硬體呈現平台。
Note : 切記目前 ultralytics 所訓練出來的模型,並非能夠商用 ! 若需要商用需要符合 AGPL-3.0 的規範 !
三、建置 DMS 模型
運作下列步驟前,請先申請 Roboflow 帳號,並開啟 COLAB 進行以下操作,來重新訓練模型 :
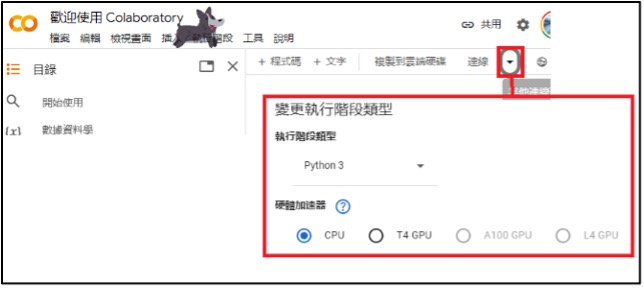
(1) 開啟 COLAB 雲端運算平台,並選用 GPU 作為處理核心:
若欲詳細了解 COLAB 的操作,可參考 【ATU Book-i.MX8系列 - Colab】 Colab 使用介紹】
(2) 下載 ultralytics 代碼 ( YOLOv5 框架) :
!git clone https://github.com/ultralytics/yolov5 (3) 安裝必要套件 :
%cd yolov5
%pip install -qr requirements.txt # install dependencies
%pip install -q roboflow
(4) 安裝 Roboflow :
Roboflow 是套線上資料管理平台,具標註影像資料、數據增強等等功能。
!pip install roboflow(5) 下載 DataBase :
from roboflow import Roboflow
rf = Roboflow(api_key="********")
project = rf.workspace("drowsiness-detection-uhhz5").project("drownsy-dectetion-v2")
version = project.version(5)
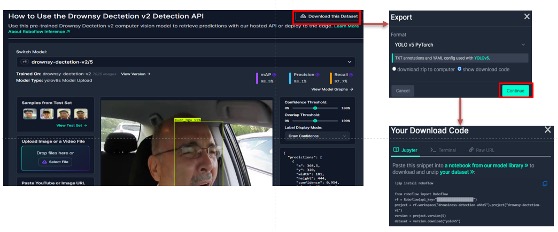
dataset = version.download("yolov5pytorch")此步驟,請先至 roboflow 網站的 drownsy-dectetion-v2 專案,依照下圖操作取得相應的 API Key 。
(6) 訓練 AI 模型
!python train.py --img 256 --batch 16 --epochs 20 --data {dataset.location}/data.yaml --weights yolov5s.pt --cache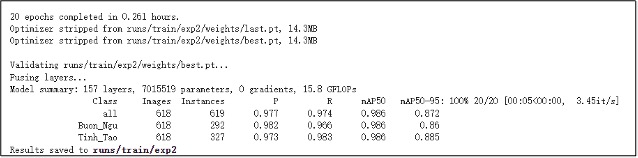
Note : 注意 mAP50 與 mAP50-95 的準確度是否符合預期。
(7) 驗證 AI 模型
!python detect.py --weights /content/yolov5/runs/train/exp/weights/best.pt  \
--img 256 --conf 0.1 --source {dataset.location}/test/images
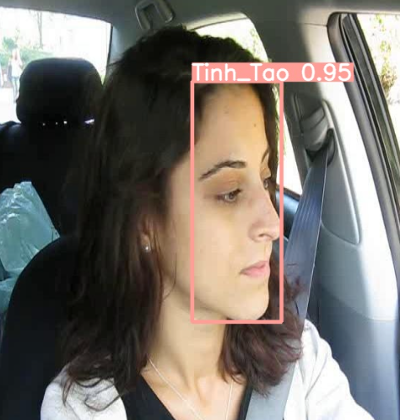
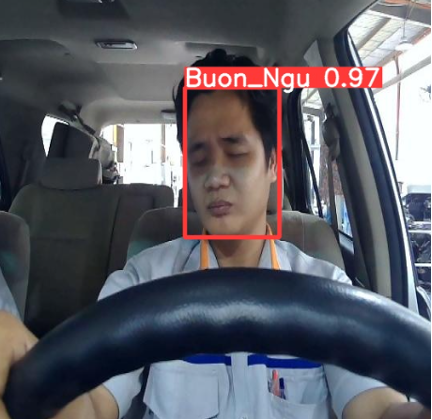
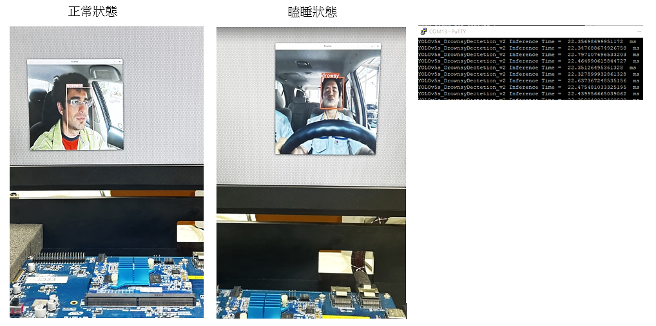
正常狀態 瞌睡狀態
Note : 請至 /content/yolov5/runs/detect 查看測試結果。
(8) 輸出 AI 模型
將 Pytorch 模組轉換成 Tensorflow Lite的形式。
!python export.py --weights /content/yolov5/runs/train/exp/weights/best.pt --img-size 256 --include tflite
(9) 輸出 AI 模型 (量化整數)
將 Tensorflow 轉換成 Tensorflow Lite 模組,並將 權重(weights) 量化成整數形式。
# Tensorflow to TF Lite  (INT)
import tensorflow as tf
import numpy as np
def representative_dataset_gen(): # 模擬數據集 (已亂隨構成的測試集會影像精準度)
    for _ in range(250):
        yield [np.random.uniform(0.0, 1.0 , size=(1,256,256,3)).astype(np.float32)]

converter = tf.lite.TFLiteConverter.from_saved_model("/content/yolov5/runs/train/exp/weights/best_saved_model")
converter.optimizations = [tf.lite.Optimize.DEFAULT]
converter.target_spec.supported_ops = [tf.lite.OpsSet.TFLITE_BUILTINS_INT8]
converter.allow_custom_ops = True
converter.inference_input_type  = tf.float32
converter.inference_output_type = tf.float32
converter.representative_dataset = representative_dataset_gen
tflite_model = converter.convert()
with tf.io.gfile.GFile("DrownsyDectetion_v2-quant.tflite", 'wb') as f:
   f.write(tflite_model)
print("Quantization complete! - model.tflite") 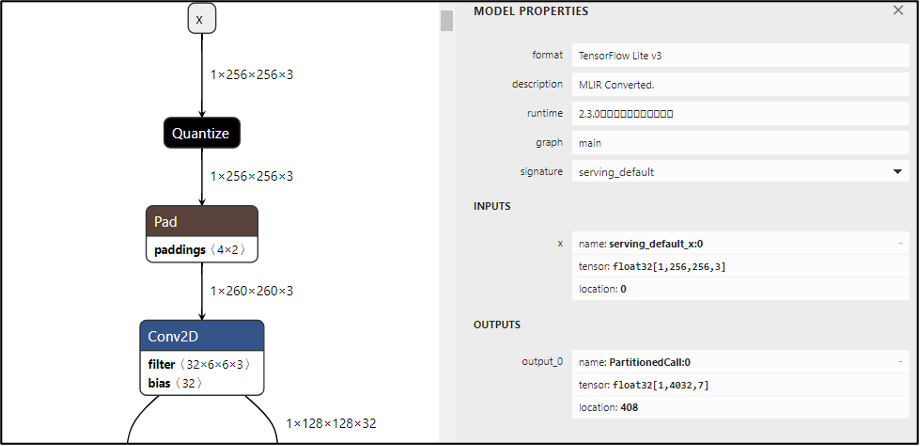
四、運行至 NXP i.MX 8M Plus 平台
最後僅需要把「模組」佈署至 NXP 平台,即可實現終端邊緣運算應用 「疲勞駕駛監控系統(DMS)」 !! 下列代碼,請於 NXP i.MX8M Plus 平台的系統中操作 :
Note : 若讀者欲想快速得到代碼,亦可從 Github查閱
(1) 建立資料夾
$ mkdir YOLOv5s_DrownsyDectetion_v2
$ cd YOLOv5s_DrownsyDectetion_v2
$ mkdir model
$ mkdir img
$ mkdir output
(2) 複製測試圖片與模組
$ cp DrownsyDectetion_v2-quant.tflite  /home/root/YOLOv5s_DrownsyDectetion_v2/model
$ cp test.jpg /home/root/YOLOv5s_DrownsyDectetion_v2/img
Note : 請至 /content/yolov5/Drownsy-Dectetion-v2-5/test/images 複製一張測試圖片。
(3) 建立 plot.py
import cv2
import torch
import numpy as np
from PIL import Image, ImageDraw, ImageFont

FONT = 'Arial.ttf'

class Colors:
    # Ultralytics color palette https://ultralytics.com/
    def __init__(self):
        # hex = matplotlib.colors.TABLEAU_COLORS.values()
        hexs = ('FF3838', 'FF9D97', 'FF701F', 'FFB21D', 'CFD231', '48F90A', '92CC17', '3DDB86', '1A9334', '00D4BB',
                '2C99A8', '00C2FF', '344593', '6473FF', '0018EC', '8438FF', '520085', 'CB38FF', 'FF95C8', 'FF37C7')
        self.palette = [self.hex2rgb(f'#{c}') for c in hexs]
        self.n = len(self.palette)

    def __call__(self, i, bgr=False):
        c = self.palette[int(i) % self.n]
        return (c[2], c[1], c[0]) if bgr else c

     @staticmethod
    def hex2rgb(h):  # rgb order (PIL)
        return tuple(int(h[1 + i:1 + i + 2], 16) for i in (0, 2, 4))

colors = Colors()  # create instance for 'from utils.plots import colors'

def check_pil_font(font=FONT, size=10):
    # Return a PIL TrueType Font, downloading to CONFIG_DIR if necessary
    font = Path(font)
    font = font if font.exists() else (CONFIG_DIR / font.name)
    try:
        return ImageFont.truetype(str(font) if font.exists() else font.name, size)
    except Exception:  # download if missing
        try:
            check_font(font)
            return ImageFont.truetype(str(font), size)
        except TypeError:
            check_requirements('Pillow>=8.4.0')  # known issue https://github.com/ultralytics/yolov5/issues/5374
        except URLError:  # not online
            return ImageFont.load_default()

def is_ascii(s=''):
    # Is string composed of all ASCII (no UTF) characters? (note str().isascii() introduced in python 3.7)
    s = str(s)  # convert list, tuple, None, etc. to str
    return len(s.encode().decode('ascii', 'ignore')) == len(s)

class Annotator:
    # YOLOv5 Annotator for train/val mosaics and jpgs and detect/hub inference annotations
    def __init__(self, im, line_width=None, font_size=None, font='Arial.ttf', pil=False, example='abc'):
        assert im.data.contiguous, 'Image not contiguous. Apply np.ascontiguousarray(im) to Annotator() input images.'
        non_ascii = not is_ascii(example)  # non-latin labels, i.e. asian, arabic, cyrillic
        self.pil = pil or non_ascii
        if self.pil:  # use PIL
            self.im = im if isinstance(im, Image.Image) else Image.fromarray(im)
            self.draw = ImageDraw.Draw(self.im)
            self.font = check_pil_font(font='Arial.Unicode.ttf' if non_ascii else font,
                                       size=font_size or max(round(sum(self.im.size) / 2 * 0.035), 12))
        else:  # use cv2
            self.im = im
        self.lw = line_width or max(round(sum(im.shape) / 2 * 0.003), 2)  # line width

    def box_label(self, box, label='', color=(128, 128, 128), txt_color=(255, 255, 255)):
        # Add one xyxy box to image with label
        if self.pil or not is_ascii(label):
            self.draw.rectangle(box, width=self.lw, outline=color)  # box
            if label:
                w, h = self.font.getsize(label)  # text width, height (WARNING: deprecated) in 9.2.0
                # _, _, w, h = self.font.getbbox(label)  # text width, height (New)
                outside = box[1] - h >= 0  # label fits outside box
                self.draw.rectangle(
                    (box[0], box[1] - h if outside else box[1], box[0] + w + 1,
                     box[1] + 1 if outside else box[1] + h + 1),
                    fill=color,
                )
                # self.draw.text((box[0], box[1]), label, fill=txt_color, font=self.font, anchor='ls')  # for PIL>8.0
                self.draw.text((box[0], box[1] - h if outside else box[1]), label, fill=txt_color, font=self.font)
        else:  # cv2
            p1, p2 = (int(box[0]), int(box[1])), (int(box[2]), int(box[3]))
            cv2.rectangle(self.im, p1, p2, color, thickness=self.lw, lineType=cv2.LINE_AA)
            if label:
                tf = max(self.lw - 1, 1)  # font thickness
                w, h = cv2.getTextSize(label, 0, fontScale=self.lw / 3, thickness=tf)[0]  # text width, height
                outside = p1[1] - h >= 3
                p2 = p1[0] + w, p1[1] - h - 3 if outside else p1[1] + h + 3
                cv2.rectangle(self.im, p1, p2, color, -1, cv2.LINE_AA)  # filled
                cv2.putText(self.im,
                            label, (p1[0], p1[1] - 2 if outside else p1[1] + h + 2),
                            0,
                            self.lw / 3,
                            txt_color,
                            thickness=tf,
                            lineType=cv2.LINE_AA)

    def masks(self, masks, colors, im_gpu, alpha=0.5, retina_masks=False):
        """Plot masks at once.
        Args:
            masks (tensor): predicted masks on cuda, shape: [n, h, w]
            colors (List[List[Int]]): colors for predicted masks, [[r, g, b] * n]
            im_gpu (tensor): img is in cuda, shape: [3, h, w], range: [0, 1]
            alpha (float): mask transparency: 0.0 fully transparent, 1.0 opaque
        """
        if self.pil:
            # convert to numpy first
            self.im = np.asarray(self.im).copy()
        if len(masks) == 0:
            self.im[:] = im_gpu.permute(1, 2, 0).contiguous().cpu().numpy() * 255
        colors = torch.tensor(colors, device=im_gpu.device, dtype=torch.float32) / 255.0
        colors = colors[:, None, None]  # shape(n,1,1,3)
        masks = masks.unsqueeze(3)  # shape(n,h,w,1)
        masks_color = masks * (colors * alpha)  # shape(n,h,w,3

        inv_alph_masks = (1 - masks * alpha).cumprod(0)  # shape(n,h,w,1)
        mcs = (masks_color * inv_alph_masks).sum(0) * 2  # mask color summand shape(n,h,w,3)

        im_gpu = im_gpu.flip(dims=[0])  # flip channel
        im_gpu = im_gpu.permute(1, 2, 0).contiguous()  # shape(h,w,3)
        im_gpu = im_gpu * inv_alph_masks[-1] + mcs
        im_mask = (im_gpu * 255).byte().cpu().numpy()
        self.im[:] = im_mask if retina_masks else scale_image(im_gpu.shape, im_mask, self.im.shape)
        if self.pil:
            # convert im back to PIL and update draw
            self.fromarray(self.im)

    def rectangle(self, xy, fill=None, outline=None, width=1):
        # Add rectangle to image (PIL-only)
        self.draw.rectangle(xy, fill, outline, width)

    def text(self, xy, text, txt_color=(255, 255, 255), anchor='top'):
        # Add text to image (PIL-only)
        if anchor == 'bottom':  # start y from font bottom
            w, h = self.font.getsize(text)  # text width, height
            xy[1] += 1 - h
        self.draw.text(xy, text, fill=txt_color, font=self.font)

    def fromarray(self, im):
        # Update self.im from a numpy array
        self.im = im if isinstance(im, Image.Image) else Image.fromarray(im)
        self.draw = ImageDraw.Draw(self.im)

    def result(self):
        # Return annotated image as array
        return np.asarray(self.im)
(4) 建立 app.py
import sys
import cv2
import torch
import torchvision
import time
import argparse
import numpy as np
import tflite_runtime.interpreter as tflite
from plots import Annotator, colors

V4L2_YUV2_720p = "v4l2src device=/dev/video2 ! video/x-raw,format=YUY2,width=1280,height=720, pixel-aspect-ratio=1/1, framerate=30/1! videoscale!videoconvert ! appsink"

# --------------------------------------------------------------------------------------------------------------
# API
# --------------------------------------------------------------------------------------------------------------
def InferenceDelegate( model, delegate ):
    if (delegate=="vx") :
interpreter = tflite.Interpreter(model, experimental_delegates=[ tflite.load_delegate("/usr/lib/libvx_delegate.so") ])
elif(delegate=="ethosu"):
interpreter = tflite.Interpreter(model, experimental_delegates=[tflite.load_delegate("/usr/lib/libethosu_delegate.so")])
elif(delegate=="xnnpack"):
interpreter = tflite.Interpreter(model)
else :
print("ERROR : Deleget Input Fault")
return 0
return interpreter
def Label_name(x):
names = {0:'drowsy', 1:'normal'}
return names[x]
def xywh2xyxy(x):
# Convert nx4 boxes from [x, y, w, h] to [x1, y1, x2, y2] where xy1=top-left, xy2=bottom-right
y = x.clone() if isinstance(x, torch.Tensor) else np.copy(x)
y[..., 0] = x[..., 0] - x[..., 2] / 2 # top left x
y[..., 1] = x[..., 1] - x[..., 3] / 2 # top left y
y[..., 2] = x[..., 0] + x[..., 2] / 2 # bottom right x
y[..., 3] = x[..., 1] + x[..., 3] / 2 # bottom right y
return y
def non_max_suppression(
prediction,
conf_thres=0.25,
iou_thres=0.45,
classes=None,
agnostic=False,
multi_label=False,
labels=(),
max_det=300,
nm=0, # number of masks
):
"""Non-Maximum Suppression (NMS) on inference results to reject overlapping detections
Returns:
list of detections, on (n,6) tensor per image [xyxy, conf, cls]
"""
# Checks
assert 0 <= conf_thres <= 1, f'Invalid Confidence threshold {conf_thres}, valid values are between 0.0 and 1.0'
assert 0 <= iou_thres <= 1, f'Invalid IoU {iou_thres}, valid values are between 0.0 and 1.0'
if isinstance(prediction, (list, tuple)): # YOLOv5 model in validation model, output = (inference_out, loss_out)
prediction = prediction[0] # select only inference output
device = prediction.device
mps = 'mps' in device.type # Apple MPS
if mps: # MPS not fully supported yet, convert tensors to CPU before NMS
prediction = prediction.cpu()
bs = prediction.shape[0] # batch size
nc = prediction.shape[2] - nm - 5 # number of classes
xc = prediction[..., 4] > conf_thres # candidates
# Settings
# min_wh = 2 # (pixels) minimum box width and height
max_wh = 7680 # (pixels) maximum box width and height
max_nms = 30000 # maximum number of boxes into torchvision.ops.nms()
time_limit = 0.5 + 0.05 * bs # seconds to quit after
redundant = True # require redundant detections
multi_label &= nc > 1 # multiple labels per box (adds 0.5ms/img)
merge = False # use merge-NMS
t = time.time()
mi = 5 + nc # mask start index
output = [torch.zeros((0, 6 + nm), device=prediction.device)] * bs
for xi, x in enumerate(prediction): # image index, image inference
# Apply constraints
# x[((x[..., 2:4] < min_wh) | (x[..., 2:4] > max_wh)).any(1), 4] = 0 # width-height
x = x[xc[xi]] # confidence
# Cat apriori labels if autolabelling
if labels and len(labels[xi]):
lb = labels[xi]
v = torch.zeros((len(lb), nc + nm + 5), device=x.device)
v[:, :4] = lb[:, 1:5] # box
v[:, 4] = 1.0 # conf
v[range(len(lb)), lb[:, 0].long() + 5] = 1.0 # cls
x = torch.cat((x, v), 0)
# If none remain process next image
if not x.shape[0]:
continue
# Compute conf
x[:, 5:] *= x[:, 4:5] # conf = obj_conf * cls_conf
# Box/Mask
box = xywh2xyxy(x[:, :4]) # center_x, center_y, width, height) to (x1, y1, x2, y2)
mask = x[:, mi:] # zero columns if no masks
# Detections matrix nx6 (xyxy, conf, cls)
if multi_label:
i, j = (x[:, 5:mi] > conf_thres).nonzero(as_tuple=False).T
x = torch.cat((box[i], x[i, 5 + j, None], j[:, None].float(), mask[i]), 1)
else: # best class only
conf, j = x[:, 5:mi].max(1, keepdim=True)
x = torch.cat((box, conf, j.float(), mask), 1)[conf.view(-1) > conf_thres]
# Filter by class
if classes is not None:
x = x[(x[:, 5:6] == torch.tensor(classes, device=x.device)).any(1)]
# Apply finite constraint
# if not torch.isfinite(x).all():
# x = x[torch.isfinite(x).all(1)]
# Check shape
n = x.shape[0] # number of boxes
if not n: # no boxes
continue
x = x[x[:, 4].argsort(descending=True)[:max_nms]] # sort by confidence and remove excess boxes
# Batched NMS
c = x[:, 5:6] * (0 if agnostic else max_wh) # classes
boxes, scores = x[:, :4] + c, x[:, 4] # boxes (offset by class), scores
i = torchvision.ops.nms(boxes, scores, iou_thres) # NMS
i = i[:max_det] # limit detections
if merge and (1 < n < 3E3): # Merge NMS (boxes merged using weighted mean)
# update boxes as boxes(i,4) = weights(i,n) * boxes(n,4)
iou = box_iou(boxes[i], boxes) > iou_thres # iou matrix
weights = iou * scores[None] # box weights
x[i, :4] = torch.mm(weights, x[:, :4]).float() / weights.sum(1, keepdim=True) # merged boxes
if redundant:
i = i[iou.sum(1) > 1] # require redundancy
output[xi] = x[i]
if mps:
output[xi] = output[xi].to(device)
if (time.time() - t) > time_limit:
break # time limit exceeded
return output
def clip_boxes(boxes, shape):
# Clip boxes (xyxy) to image shape (height, width)
if isinstance(boxes, torch.Tensor): # faster individually
boxes[..., 0].clamp_(0, shape[1]) # x1
boxes[..., 1].clamp_(0, shape[0]) # y1
boxes[..., 2].clamp_(0, shape[1]) # x2
boxes[..., 3].clamp_(0, shape[0]) # y2
else: # np.array (faster grouped)
boxes[..., [0, 2]] = boxes[..., [0, 2]].clip(0, shape[1]) # x1, x2
boxes[..., [1, 3]] = boxes[..., [1, 3]].clip(0, shape[0]) # y1, y2
def scale_boxes(img1_shape, boxes, img0_shape, ratio_pad=None):
# Rescale boxes (xyxy) from img1_shape to img0_shape
if ratio_pad is None: # calculate from img0_shape
gain = min(img1_shape[0] / img0_shape[0], img1_shape[1] / img0_shape[1]) # gain = old / new
pad = (img1_shape[1] - img0_shape[1] * gain) / 2, (img1_shape[0] - img0_shape[0] * gain) / 2 # wh padding
else:
gain = ratio_pad[0][0]
pad = ratio_pad[1]
boxes[..., [0, 2]] -= pad[0] # x padding
boxes[..., [1, 3]] -= pad[1] # y padding
boxes[..., :4] /= gain
clip_boxes(boxes, img0_shape)
return boxes
def letterbox(im, new_shape=(640, 640), color=(114, 114, 114), auto=True, scaleFill=False, scaleup=True, stride=32):
# Resize and pad image while meeting stride-multiple constraints
shape = im.shape[:2] # current shape [height, width]
if isinstance(new_shape, int):
new_shape = (new_shape, new_shape)
# Scale ratio (new / old)
r = min(new_shape[0] / shape[0], new_shape[1] / shape[1])
if not scaleup: # only scale down, do not scale up (for better val mAP)
r = min(r, 1.0)
# Compute padding
ratio = r, r # width, height ratios
new_unpad = int(round(shape[1] * r)), int(round(shape[0] * r))
dw, dh = new_shape[1] - new_unpad[0], new_shape[0] - new_unpad[1] # wh padding
if auto: # minimum rectangle
dw, dh = np.mod(dw, stride), np.mod(dh, stride) # wh padding
elif scaleFill: # stretch
dw, dh = 0.0, 0.0
new_unpad = (new_shape[1], new_shape[0])
ratio = new_shape[1] / shape[1], new_shape[0] / shape[0] # width, height ratios
dw /= 2 # divide padding into 2 sides
dh /= 2
if shape[::-1] != new_unpad: # resize
im = cv2.resize(im, new_unpad, interpolation=cv2.INTER_LINEAR)
top, bottom = int(round(dh - 0.1)), int(round(dh + 0.1))
left, right = int(round(dw - 0.1)), int(round(dw + 0.1))
im = cv2.copyMakeBorder(im, top, bottom, left, right, cv2.BORDER_CONSTANT, value=color) # add border
return im, ratio, (dw, dh)
# --------------------------------------------------------------------------------------------------------------
# 主程式
# --------------------------------------------------------------------------------------------------------------
def main():
# 解析外部資訊
APP_NAME = "YOLOv5s_DrownsyDectetion_v2"
parser = argparse.ArgumentParser()
parser.add_argument( '-c' ,"--camera", default="0")
parser.add_argument( '-d' ,"--display", default="0")
parser.add_argument("--save", default="1")
parser.add_argument( '-t', "--time", default="0")
parser.add_argument('--delegate' , default="vx", help = 'Please Input vx or xnnpack or ethosu')
parser.add_argument( '-m', '--model' , default="model/DrownsyDectetion_v2-quant.tflite", help='File path of .tflite file.')
parser.add_argument("--test_img", default="img/test2.jpg")
args = parser.parse_args()
# 解析解譯器資訊
interpreter = InferenceDelegate(args.model,args.delegate)
interpreter.allocate_tensors()
input_details = interpreter.get_input_details()
output_details = interpreter.get_output_details()
width = input_details[0]['shape'][2]
height = input_details[0]['shape'][1]
nChannel = input_details[0]['shape'][3]
scale, zero_point = input_details[0]['quantization']
#print(scale)
# 先行進行暖開機
if (input_details[0]['dtype']==np.uint8) :
interpreter.set_tensor(input_details[0]['index'], np.zeros((1,height,width,nChannel)).astype("uint8") )
else :
interpreter.set_tensor(input_details[0]['index'], np.zeros((1,height,width,nChannel)).astype("float32") )
interpreter.invoke()
# 是否啟用攝鏡頭
if args.camera =="True" or args.camera == "1" :
cap = cv2.VideoCapture(V4L2_YUV2_720p)
if(cap.isOpened()==False) :
print( "Open Camera Failure !!")
sys.exit()
else :
print( "Open Camera Success !!")
# 迴圈 / 重複推理
while(True):
# 視訊/影像資料來源
if args.camera =="True" or args.camera == "1" :
ret, frame = cap.read()
else :
frame = cv2.imread(args.test_img)
frame_resized = letterbox(frame, (width,height), stride=32, auto=False)[0] # padded resize
#frame_resized = cv2.cvtColor(frame_resized, cv2.COLOR_RGB2GRAY)
#frame_resized = cv2.cvtColor(frame_resized, cv2.COLOR_GRAY2RGB)
frame_resized = frame_resized.transpose((2, 0, 1))[::-1] # HWC to CHW, BGR to RGB
frame_resized = np.ascontiguousarray(frame_resized)
if (input_details[0]['dtype']==np.uint8) :
frame_resized = (frame_resized/scale) + zero_point
else :
frame_resized = (frame_resized/255.0)
# 設置來源資料至解譯器
if (input_details[0]['dtype']==np.uint8) :
input_data = np.expand_dims(frame_resized , axis=0).astype(np.uint8)
else :
input_data = np.expand_dims(frame_resized , axis=0).astype(np.float32)
input_data = input_data.swapaxes(1,2)
input_data = input_data.swapaxes(2,3)
interpreter.set_tensor(input_details[0]['index'], input_data )
# 解譯器進行推理
interpreter_time_start = time.time()
interpreter.invoke()
interpreter_time_end = time.time()
if args.time =="True" or args.time == "1" :
print( APP_NAME + " Inference Time = ", (interpreter_time_end - interpreter_time_start)*1000 , " ms" )
# 取得解譯器的預測結果
y = []
for output in output_details:
x = interpreter.get_tensor(output_details[0]['index'])
#print(x)
if (input_details[0]['dtype']==np.uint8) :
scale, zero_point = output_details[0]['quantization']
x = (x.astype(np.float32) - zero_point) * scale # re-scale
y.append(x)
y = [x if isinstance(x, np.ndarray) else x.numpy() for x in y]
y[0][..., :4] *= [width, height, width, height]
# 正規化
pred = non_max_suppression(torch.from_numpy(y[0]), 0.2, 0.4, None, False, max_det=1000)
pred[0] = pred[0][(pred[0][:, 0] - pred[0][:, 2]).abs() >= 10] # H-Filter
pred[0] = pred[0][(pred[0][:, 1] - pred[0][:, 3]).abs() >= 10] # W-Filter
# 建立輸出結果
for idx, det in enumerate(pred):
annotator = Annotator(frame, line_width=3)
if len(det):
det[:, :4] = scale_boxes([width, height], det[:, :4], frame.shape).round()
# Add bbox to image
for *xyxy, conf, cls in reversed(det):
c = int(cls) # integer class
label = Label_name(c)
annotator.box_label(xyxy, label, color=colors(c, True))
# update show-out
frame = annotator.result()
# 顯示輸出結果
if args.save == "True" or args.save == "1" :
cv2.imwrite( "output/" + APP_NAME + "-" + args.test_img.split("/")[-1][:-4] +'_result.jpg', frame.astype("uint8"))
print("Save Reuslt Image Success , " + APP_NAME + args.test_img.split("/")[-1][:-4] + '_result.jpg')
if args.display =="True" or args.display == "1" :
cv2.imshow('frame', frame.astype('uint8'))
if cv2.waitKey(1) & 0xFF == ord('q'): break
if (args.display =="False" or args.display == "0") and( args.camera =="False" or args.camera == "0" ) : sys.exit()
cap.release()
cv2.destroyAllWindows()
if __name__ == "__main__":
main()
(5) 運行 APP
python3 app.py -c 0 -d 1 --save 0Note : 若想更換輸入源為攝像頭,將代碼由 -c 0 改成 -c 1 ( 並且注意裝置是否為 /dev/video2 )。
五、結語
近年無數學者、研究員與業者致力於研究物件偵測相關的應用,如今僅需要利用簡單幾個步驟就完成一個簡單的『 YOLOv5 物件識別 』,且僅需短短幾個小時即可訓練出模型,相比與過去實在天壤之别。因此如何部屬至各個硬體平台端就是『落地的關鍵指標之一』,本篇文章以『NXP i.MX 8M Plus 』作為實現邊緣運算的裝置,並利用所謂的 NPU 來實現模組的加速運算,僅需 22 毫秒(ms) 即可完成一張物件辨識 ! 並搭配影像串流的技術即可輕鬆達到 Realtime 的效能 !! 讓邊緣裝置可以最即時掌握與反應實際情況 !! 若對技術移植感興趣的讀者,可以持續關注 ATU 一部小編的 NXP i.MX 系列博文 或是直接聯繫 ATU 團隊 ! 謝謝 !!
六、參考文件
[1] i.MX 8 Series Applications Processors Multicore Arm® Cortex® Processors
[2] NXP Document - i.MX Yocto Project User's Guide.pdf
[3] Welcome to the Yocto Project Documentation
[4] NXP Document - i.MX Linux Release Note
[5] NXP Document - i.MX Machine Learning User's Guide
[6] Roboflow
[7] Ultralytics
如有任何相關 Machine Learning 技術問題,歡迎至博文底下留言提問 !!
接下來還會分享更多 Machine Learning的技術文章 !!敬請期待 【ATU Book-NXP i.MX系列 - ML】 !!

評論
Captain
2024年8月20日