

一. 概述
在邊緣運算的重點技術之中,模組輕量化網路架構 是不可或缺的一環,如何高效的利用硬體資源來達到最佳目標,特別是在效能與準確度的衡量上,是個非常有趣的議題。此章節再來探討深度學習熱門的研究項目之一 人臉偵測(Face Detection) ,在過去的技術中,常使用 Harr Cascade、Adaboost 這類傳統影像與機器學習技術的分類器來實現擷取人臉位置。其中最具代表性、最受廣泛使用的莫過於 OpenCV 所提供的方法。但可惜的是這種分類器的運算模式,不足以匹配現今熱門神經網路處理器的運算模式。對於深度學習技術中,較常見的為 RetinaFace、yolo、MobileNet SSD、FaceNet、ArcFace 等架構皆可實現人臉識別之目的。
若新讀者欲理解更多人工智慧、機器學習以及深度學習的資訊,可點選查閱下方博文
大大通精彩博文 【ATU Book-i.MX8系列】博文索引

TensorFlow Lite 進階系列博文-文章架構示意圖
二. 算法介紹
由於 邊緣運算(edge computing) 需以輕量、快速、準確為主,故採用神經網路架構最輕量,且有一定識別能力、運行效率極佳的 MobileNet SSD 架構。
由 輕量化網路架構 MobileNet 與 物件檢測算法(Single Shot MultiBox Detector, SSD) 組成之應用。
神經網路架構探討 :
(1) MobileNet
核心概念是利用拆分的概念,將原本的卷積層拆成 深度卷積(Depthwise Convolution) 與 逐點卷積(Pointwise Convolution) 兩個部分,稱作 深層可分離卷積(Depthwise Separable Convolution)。
以此方式進行運算,能夠大幅度減少參數量,以達到加快運算速度。(用途擷取特徵)

MobileNet 輕量化概念示意圖, 參考 LaptrihnX 網站
(2) Single Shot Multi-Box Detector, SSD
核心概念是由 金字塔特徵結構(Pyramidal Feature Hierarchy) 與 先驗框(Prior boxes) 的概念組成。
金字塔特徵結構(Pyramidal Feature Hierarchy) :
採用不同大小的特徵圖檢測物件,比如說大特徵圖檢測小物件、小特徵圖檢測大物件。
先驗框(Prior boxes) :
讓每個特徵圖上設置不同尺寸、長寬比的先驗框,以作為預測框的基準。這能夠幫助訓練過程時,提供梯度一定程度的範圍限制,能夠降低一定程度的訓練難度。
如下圖所示,將每個不同大小的輸出層去加上 檢測器(detector) 來進行人臉位置預測。
最後再將每層結果結合至 NMS(non-maximum suppression) 非最大抑制層來找到圖片中最佳的人臉位置。
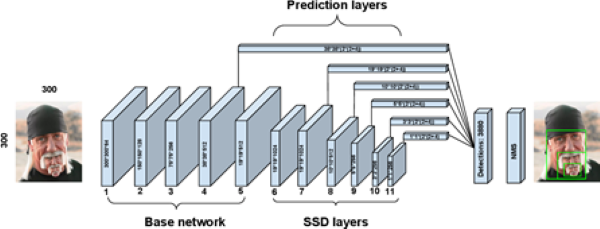
SSD 架構概念示意圖 , 參考 SSD-SFace 論文
WIDER FACE DataSets :
(此小節所介紹的核心算法與物件偵測相同,僅是將資料庫更換為 Widerface 人臉資料庫)
資料庫連結 : http://shuoyang1213.me/WIDERFACE/

三. 算法實現
Google 官方有提供效果極佳的 mobilenet_object_detector.tflite 模組,即可直接使用,請點選下載。
同一上篇文章,這裡將再次利用遷移學習方法與 TF-Slim 函示庫、WIDER FACE 資料庫來實現 MobileNet SSD人臉檢測器(Face Detection)。
實現步驟如下:
第一步 : 開啟 Colab 設定環境
%tensorflow_version 1.x
!python -c 'import matplotlib as tf; print(tf.__version__)' # Check the version of the tensorflow
※ 由於 colab 已暫停支援 Tensorflow 1.x 的方式,請本機方式實現。
第二步 : TensorFlow Model Garden 下載與安裝
%cd root
!git clone https://github.com/tensorflow/models.git
%cd root/models/research/
!protoc object_detection/protos/*.proto --python_out=. # gernate *.proto
!python setup.py build  # 建置 TensorFlow Model Garden 檔案
第三步 : TensorFlow Slim 下載與安裝
import os
os.environ['PYTHONPATH'] += ':/root/models/research/:/root/models/research/slim/:/root/models/research/object_detection/utils/:/root/models/research/object_detection'
!pip install tf_slim # 安裝 TensorFlow  Slim
!python object_detection/builders/model_builder_test.py   # TensorFlow  Slim 模組建立是否成功測試
第四步 : 下載資料庫
※ 使用 Widerface 人臉資料庫
%cd /root/models/
!git clone https://github.com/yeephycho/widerface-to-tfrecord.git
# 建立資料夾
%cd /root/models/widerface-to-tfrecord/
!mkdir WIDER
%cd WIDER
# 下載並解壓縮 Widerdafe 資料庫 (訓練)
%cd /root/models/widerface-to-tfrecord/WIDER/
#WIDER_train
!gdown https://drive.google.com/u/0/uc?id=0B6eKvaijfFUDQUUwd21EckhUbWs&export=download
!unzip WIDER_train.zip
!rm WIDER_train.zip

# 下載並解壓縮 Widerdafe 資料庫 (驗證)
!gdown https://drive.google.com/u/0/uc?id=0B6eKvaijfFUDd3dIRmpvSk8tLUk&export=download
!unzip WIDER_val.zip
!rm WIDER_val.zip
# 下載並解壓縮 Widerdafe 資料庫 (測試)
!gdown https://drive.google.com/u/0/uc?id=0B6eKvaijfFUDbW4tdGpaYjgzZkU&export=download
!unzip WIDER_test.zip
!rm WIDER_test.zip
第五步 : 下載標籤
# 下載訓練時須用到物件訊息 (此處須更新 wider_face_train_annot.txt )
%cd /root/models/widerface-to-tfrecord/WIDER/
!gdown http://mmlab.ie.cuhk.edu.hk/projects/WIDERFace/support/bbx_annotation/wider_face_split.zip
!unzip wider_face_split.zip
!rm wider_face_split.zip
!mv /root/models/widerface-to-tfrecord/WIDER/wider_face_split/wider_face_train_bbx_gt.txt wider_face_train_annot.txt
!mv /root/models/widerface-to-tfrecord/WIDER/wider_face_split/wider_face_test_filelist.txt wider_face_test_annot.txt
!mv /root/models/widerface-to-tfrecord/WIDER/wider_face_split/wider_face_val_bbx_gt.txt wider_face_val_annot.txt
!rm -r wider_face_split
第六步 : 製作 TensorFlow Record
%cd /root/models/widerface-to-tfrecord/
!mkdir output
%cd /root/models/widerface-to-tfrecord/
!python3 widerface_To_TFRecord.py # 建立 TensorFlow Record
※ 執行後,將於 models/widerface-to-tfrecord/output 資料夾內產出 train.record & test.record' 檔案
※ 由於 WIDER 資料庫提供的圖庫有些已失效,故須更新 widerface_To_TFRecord.py (如連結)
第七步 : 下載訓練過的 MobileNet 模組
此步驟利用之前訓練過的模組資源重新訓練,即 遷移學習(Transfer Learning) 的技術。
%cd ~/models
import shutil
import tarfile
from requests import get
MODEL = 'ssd_mobilenet_v1_coco_2017_11_17'
MODEL_FILE = MODEL + '.tar.gz'
DOWNLOAD_BASE = 'http://download.tensorflow.org/models/object_detection/'
DEST_DIR = 'pretrained_model'
# 下載mobilenet 模組
if not (os.path.exists(MODEL_FILE)):
  with open(MODEL_FILE, "wb") as file:
    response = get(DOWNLOAD_BASE + MODEL_FILE)
    file.write(response.content)
# 解壓縮 mobilenet 模組
tar = tarfile.open(MODEL_FILE)
tar.extractall()
tar.close()
os.remove(MODEL_FILE)
if (os.path.exists(DEST_DIR)):
  shutil.rmtree(DEST_DIR)
os.rename(MODEL, DEST_DIR)
# 移動 mobilenet.config" 資訊
shutil.move( "/root/models/research/object_detection/samples/configs/ssd_mobilenet_v1_coco.config", "/root/models" )
第八步 : 修改 Config 檔案
%cd /root/models/research/
# Edit Pipeline
import tensorflow as tf
from google.protobuf import text_format
from object_detection.protos import pipeline_pb2
pipeline = pipeline_pb2.TrainEvalPipelineConfig()
config_path = '/root/models/ssd_mobilenet_v1_coco.config'
with tf.gfile.GFile( config_path, "r") as f:
    proto_str = f.read()
    text_format.Merge(proto_str, pipeline)
pipeline.train_input_reader.tf_record_input_reader.input_path[:] = ['/root/models/widerface-to-tfrecord/output/train.tfrecord']
pipeline.train_input_reader.label_map_path = ' '/root/models/widerface-to-tfrecord/data/face-detection.pbtxt’
pipeline.eval_input_reader[0].tf_record_input_reader.input_path[:] = [' /root/models/widerface-to-tfrecord/output/test.record ']
pipeline.eval_input_reader[0].label_map_path = ' /root/models/widerface-to-tfrecord/data/face-detection.pbtxt '
pipeline.train_config.fine_tune_checkpoint = ' /root/models/pretrained_model/model.ckpt'
pipeline.train_config.num_steps = 500 # training step
pipeline.model.ssd.num_classes = 1 # classes num
pipeline.eval_config.num_examples = 5 # test image number
config_text = text_format.MessageToString(pipeline)
with tf.gfile.Open( config_path, "wb") as f:
    f.write(config_text)
第九步 : 進行訓練
!python /root/models/research/object_detection/legacy/train.py \
    --logtostderr \
    --train_dir=/root/models/trained \
    --pipeline_config_path=/root/models/ssd_mobilenet_v1_coco.config
※ 訓練完成後,將於 models/trained/ 資料夾內產出 model.ckpt-500 檔案
第十步 : 產生 Frozen Graph
此步驟可以調整模組輸出大小,比如說將原本輸入大小 224x224 改成 96x96 。
!python /root/models/research/object_detection/export_tflite_ssd_graph.py \
    --pipeline_config_path=/root/models/ssd_mobilenet_v1_coco.config \
    --output_directory=/root/models/fine_tuned_model \
    --trained_checkpoint_prefix=/root/models/trained/model.ckpt-500
※ 訓練完成後,將於 models/fine_tuned_model / 資料夾內產出 tflite_graph.pb 檔案
第十一步 : TensorFlow Lite 轉換
# 此處以指令方式進行轉換,亦可使用上述文章所介紹代碼方式。
! tflite_convert \
  --output_file=/root/models/fine_tuned_model/mobilenetssd_uint8_face.tflite \
  --graph_def_file=/root/models/fine_tuned_model/tflite_graph.pb \
  --inference_type=QUANTIZED_UINT8 \
  --input_arrays=normalized_input_image_tensor \
  --input_shapes=1,300,300,3 \
  --output_arrays="raw_outputs/class_predictions,raw_outputs/box_encodings" \
  --default_ranges_min=0 \
  --default_ranges_max=6 \
  --mean_values=128 \
  --std_dev_values=127 \
  --allow_custom_ops
※ 訓練完成後,將於 models/fine_tuned_model / 資料夾內產出 mobilenetssd_uint8.tflite檔案
第十二步 : Object Detection 範例實現 (於 i.MX8M Plus 撰寫運行)
import cv2
import numpy as np
from tflite_runtime.interpreter import Interpreter
# 解析 tensorflow lite 檔案
interpreter = Interpreter(model_path='mobilenetssd_uint8_face.tflite') # 記得將模組移動至 i.MX8 平台
interpreter.allocate_tensors()
input_details = interpreter.get_input_details()
output_details = interpreter.get_output_details()
width = input_details[0]['shape'][2]
height = input_details[0]['shape'][1]

# 讀取測試資料,並設置於解譯器中
frame = cv2.imread('rana.jpg')
frame_rgb = cv2.cvtColor(frame, cv2.COLOR_BGR2RGB)
frame_resized = cv2.resize(frame_rgb, (width, height))
input_data = np.expand_dims(frame_resized, axis=0)
interpreter.set_tensor(input_details[0]['index'], input_data)
interpreter.invoke()# 進行推理

# 取得輸出資料
detection_boxes = interpreter.get_tensor(output_details[0]['index']) # 輸出位置資訊
detection_classes = interpreter.get_tensor(output_details[1]['index']) # 輸出類別資訊
detection_scores = interpreter.get_tensor(output_details[2]['index'])  # 輸出分數資訊
num_boxes = interpreter.get_tensor(output_details[3]['index'])

# 標示物件
for i in range(10):
  if detection_scores[0, i] > .5: # 預測值大於 0.5則顯示
    x = detection_boxes[0, i, [1, 3]] * frame_rgb.shape[1]
    y = detection_boxes[0, i, [0, 2]] * frame_rgb.shape[0]
    class_id = detection_classes[0, i]
    cv2.rectangle(frame_rgb, (x[0], y[0]), (x[1], y[1]), (0, 255, 0), 2)

cv2.imshow('Face Detector',frame)
cv2.waitKey(0)
cv2.destroyAllWindows()
實現結果 :
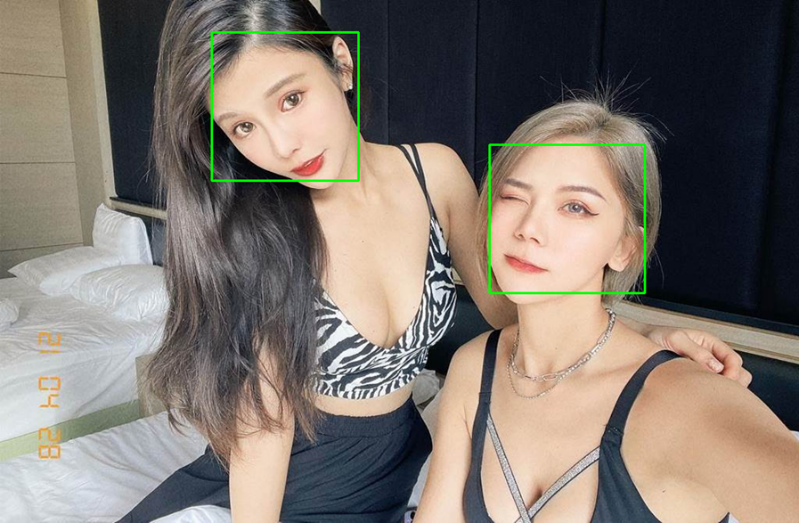
如下圖所示,成功檢測出人臉。
在 i.MX8M Plus 的 NPU 處理器,推理時間(Inference Time) 約 10 ms。

四. 結語
根據上一小節,物件偵測的作法,這裡根據 MobileNet SSD 的模組架構,以及結合 Widerface 資料庫來重新訓練出一套人臉偵測的應用 !!
在 i.MX8MP 的 Vivante VIP8000 NPU 運行,其推理時間可達每秒 9-10 ms 的處理速度,約 110 張 FPS 。此訓練的方式稱作遷移學習,在上篇與本篇文章皆是以這種技術來學習過去的特徵。在介紹此技術之前,作者將會介紹一些常見的 AI 應用像是人臉、手部身體的特徵點檢測、表情識別、風格轉換等等。下一章節將會介紹人臉偵測的延伸應用之一的 臉部表情識別(Facial Expression Recognition) !! 敬請期待 !!
五. 參考文件
[1] SSD: Single Shot MultiBox Detector
[2] SSD-Tensorflow
[3] Single Shot MultiBox Detector (SSD) 論文閱讀
[4] ssd-mobilenet v1 演算法結構及程式碼介紹
[5] Get models for TensorFlow Lite
[6] widerface-to-tfrecord
[7] MobileNets: Efficient Convolutional Neural Networks for Mobile Vision
如有任何相關 TensorFlow Lite 進階技術問題,歡迎至博文底下留言提問 !!
接下來還會分享更多 TensorFlow Lite 進階文章 !!敬請期待 【ATU Book-i.MX8系列 – TFLite 進階】 !!
評論