

一、 OpenVINO 介紹
1.何为OpenVINO?
OpenVINO™ 的全称是开放式视觉推理和神经网络优化(Open Visual Inference & Neural Network Optimization),是英特尔基于自身现有的硬件平台开发的一种可以加快高性能计算机视觉和深度学习视觉应用开发速度工具套件。该工具包可快速部署模拟人类视觉的应用程序和解决方案,它基于卷积神经网络(CNN),可扩展英特尔®硬件的计算机视觉(CV)工作负载,从而最大限度地提高性能。
OpenVINO工具包:
- 在边缘启用基于CNN的深度学习推理
- 支持跨英特尔®CPU,英特尔®集成显卡,英特尔®FPGA,英特尔®Movidius™神经计算棒,英特尔®神经计算棒2和采用英特尔®Movidius™VPU的英特尔®视觉加速器设计的异构执行
- 通过易于使用的计算机视觉功能库和预优化的内核,加快产品上市速度
- 包括针对计算机视觉标准的优化调用,包括OpenCV *,OpenCL™和OpenVX *
2.OpenVINO核心组件
OpenVINO工具包(ToolKit)主要包括两个核心组件,模型优化器(Model Optimizer)和推理引擎(Inference Engine),其他组件还包括Intel Media SDK, OpenCV, OpenCL, OpenVX以及预先训练好的模型等。
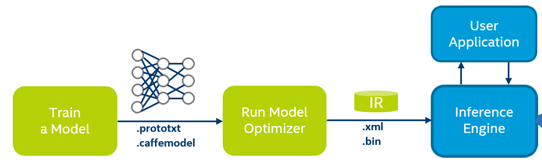
Intel Deep Learning Inference Workflow
2.1模型优化器(Model Optimizer)
模型优化器将给定的模型转化为标准的 Intermediate Representation (IR) ,并对模型进行优化。
模型优化器支持的深度学习框架有:
ONNX / TensorFlow / Caffe / MXNet / Kaldi
2.2 推理引擎(Inference Engine)
推理引擎支持硬件指令集层面的深度学习模型加速运行,同时对传统的OpenCV图像处理库也进行了指令集优化,有显著的性能与速度提升。
支持的硬件设备有:CPU / GPU / FPGA / VPU
3.支持硬件与系统
Hardware
- 6th-10th Generation Intel® Core™ processors
- Intel® Xeon® v5 family
- Intel® Xeon® v6 family
- Intel® Pentium® processor N4200/5, N3350/5, N3450/5 with Intel® HD Graphics
- Intel® Movidius™ Neural Compute Stick
- Intel® Neural Compute Stick 2
- Intel® Vision Accelerator Design with Intel® Movidius™ VPUs
- Raspberry Pi* board with ARM* ARMv7-A CPU architecture
OS (不同的OpenVINO版本可能会有变化)
- Ubuntu 16.04.x long-term support (LTS), 64-bit
- CentOS 7.4, 64-bit (for target only)
- Yocto Project Poky Jethro v2.0.3, 64-bit (for target only and requires modifications)
- Raspbian* OS, 32-bit
- macOS* 10.14.4
详细可参考intel 官网 : https://docs.openvinotoolkit.org/latest/_docs_install_guides_installing_openvino_linux.html (for linux)
二、OpenVINO安裝在RK3288
Intel OpenVINO在官方支持平台上的安装及使用,可参考相关官网文档(https://software.intel.com/en-us/openvino-toolkit/documentation/featured)
以下是参考Intel 官方树莓派安装OpenVINO文档在arm平台RK3288上的移植安装过程,供参考:
Installation Steps of Openvino on Rk3288 ---
1.Download package (take l_openvino_toolkit_ie_p_2018.5.445.tgz as an example) from the website https://download.01.org/openvinotoolkit/2018_R5/packages/ to ~/Downloads and uncompress it like this:
tar zxf l_openvino_toolkit_ie_p_2018.5.445.tgz
2.Change to ~/Downloads, and execute below cmd to set inference_engine directory:
sed -i "s||$(pwd)/inference_engine_vpu_arm|" inference_engine_vpu_arm/bin/setupvars.sh
3.Set the Environment Variables
echo "source /opt/intel/openvino/bin/setupvars.sh" >> ~/.bashrc
source ~/.bashrc
4.Add USB Rules
1)Add the current Linux user to the users group:
sudo usermod -a -G users "$(whoami)"
Log out and log in for it to take effect.
2)To perform inference on the Intel® Movidius™ Neural Compute Stick or Intel® Neural Compute Stick 2, install the USB rules running the install_NCS_udev_rules.sh script:
sh /opt/intel/openvino/install_dependencies/install_NCS_udev_rules.sh
Alternatively, instead of running the commands above, you can also do it like this:
cat < 97-myriad-usbboot.rules
SUBSYSTEM=="usb", ATTRS{idProduct}=="2150", ATTRS{idVendor}=="03e7", GROUP="users", MODE="0666", ENV{ID_MM_DEVICE_IGNORE}="1"
SUBSYSTEM=="usb", ATTRS{idProduct}=="2485", ATTRS{idVendor}=="03e7", GROUP="users", MODE="0666", ENV{ID_MM_DEVICE_IGNORE}="1"
SUBSYSTEM=="usb", ATTRS{idProduct}=="f63b", ATTRS{idVendor}=="03e7", GROUP="users", MODE="0666", ENV{ID_MM_DEVICE_IGNORE}="1"
EOF
sudo cp 97-myriad-usbboot.rules /etc/udev/rules.d/
sudo udevadm control --reload-rules
sudo udevadm trigger
sudo ldconfig
rm 97-myriad-usbboot.rules
5.Change to ~ /Downloads/inference_engine_vpu_arm, execute cmd vi ./bin/ setupvars.sh, and then add below code at line 67:
IE_PLUGING_PATH=$INTEL_CVSDK_DIR/deployment_tools/inference_engine/lib/raspbian_9/armv7l
6.Change to ~/Downloads/inference_engine_vpu_arm/deployment_tools/inference_engine/share, execute cmd vi InferenceEngineConfig.cmake, and add below code at line 121:
set(_OS_PATH "raspbian_9/")
7.If necessary, replace /usr/lib/arm-linux-gnueabihf/libstdc++.so.6 in rk3288 with the same lib in Rasberry os, inorder to keep the same libstdc++.so.6 version with Rasberry.
now you are ready to compile and run the Object Detection sample to verify the Inference Engine installation
8.Build and Run Object Detection Sample
1)Navigate to a directory that you have write access to and create a samples build directory. This example uses a directory named build: (~/Downloads/inference_engine_vpu_arm/deployment_tools/inference_engine/samples)
mkdir build && cd build
2) Build the Object Detection Sample:
cmake -DCMAKE_BUILD_TYPE=Release -DCMAKE_CXX_FLAGS="-march=armv7-a" /opt/intel/openvino/deployment_tools/inference_engine/samples
make -j2 object_detection_sample_ssd
3) Download the pre-trained Face Detection model or copy it from the host machine:
- To download the .bin file with weights:
wget --no-check-certificate https://download.01.org/opencv/2019/open_model_zoo/R1/models_bin/face-detection-adas-0001/FP16/face-detection-adas-0001.bin
- To download the .xml file with the network topology:
wget --no-check-certificate https://download.01.org/opencv/2019/open_model_zoo/R1/models_bin/face-detection-adas-0001/FP16/face-detection-adas-0001.xml
4) Run the sample with specifying the model and a path to the input image:
./armv7l/Release/object_detection_sample_ssd -m face-detection-adas-0001.xml -d MYRIAD -i
./armv7l/Release/interactive_face_detection_demo -m face-detection-adas-0001.xml -d MYRIAD
The application outputs an image (out_0.bmp) with detected faced enclosed in rectangles.
Reference:
If any mistake, please @me. Thank you!
評論
李光落
2020年8月28日