

- 開發環境
- 文件目的 :
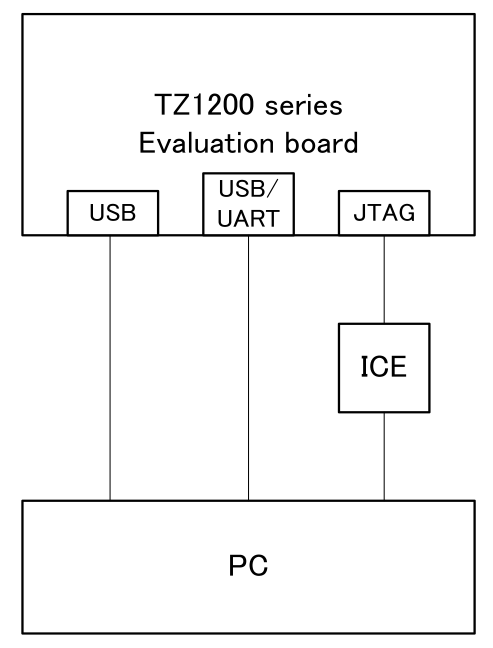
- 如何設定讓 Toshiba TZ1200 可以在 Keil 的環境下進行開發,最後並以 GPIO example 來驗證是否正常操作。開發環境方塊圖如下圖所示
- 開發工具及版本
-
IDE ‒ Keil MDK5 version 5.13 or later. (http://www2.keil.com/mdk5/)
Debug probe: ‒ SEGGER J-Link Pro or J-Link
Terminal: ‒ Tera Term
-
- Installing pack file into MDK5(μVision5)
- Installing MDK5 :
Open ”MDK version5 - Installation page” This page describes how to get and install MDK5.
-
Installing CMSIS 4 :
Download CMSIS Version 4.3.0 from “MDK5 Software Packs site”follow the screen shot.
-

-

-

-
After downloading, launch “Pack Installer” of μVision5

- Install the downloaded pack file using [File] > [Import…] of the menu

- Installing TZ12xx_DFP
-
Install “TOSHIBA.TZ12xx_DFP.1.1.0.pack” file in the same way.
This package includes with CMSIS CORE for TZ1200 series. For more details, refer to a installed document.
The default location is “ C:\Keil_v5\ARM\Pack\ARM\CMSIS\4.3.0\CMSIS\index.html.”
-
- Installing MDK5 :
- 文件目的 :
- Software Examples :
There are software examples for each drivers in pack file. You can check the usage and test it by using them actually. The software examples are browseable from "Pack installer" in MDK5
- GPIO ( example_GPIO )
This sample outputs the input from one pin of GPIO, to another one pin.
- A serial console is used for operation of this sample.
- Sets the serial console as figure Setting UART used with sample programs when starting the program.

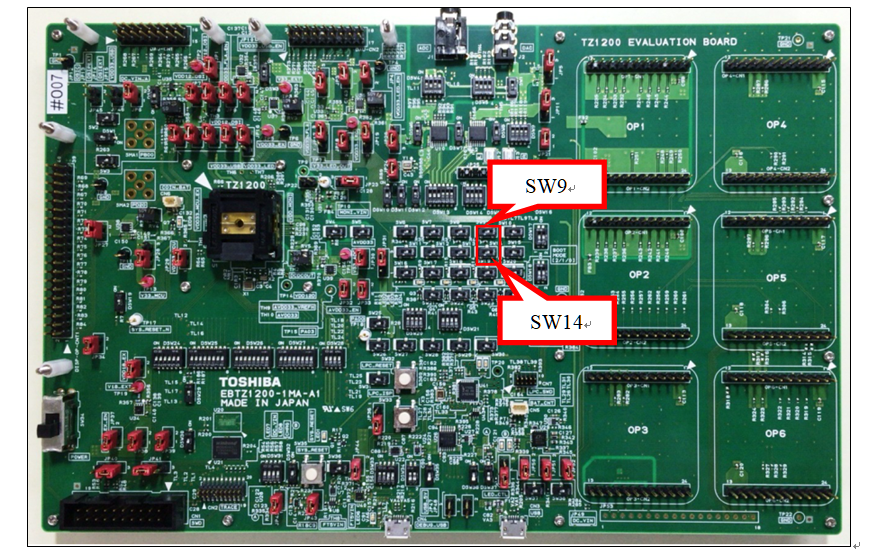
- The switches of the EBTZ1200-1MA system evaluation board should be changed as below table.
-
Table 2.1 Switches settings for GPIO
-
SW No.
Description
Setting Value
SW9
GPIO0_7 function selecting
1-2: GPIO input for software debugging
2-3: Connect to Option board connector (OP4-CN2)
1-2 short
SW14
GPIO0_7 input value setting for debug
1-2: Set to 1 for GPIO0_7 input
2-3: Set to 0 for GPIO0_7 input
1-2 short:high level
2-3 short:low level
- GPIO ( example_GPIO )
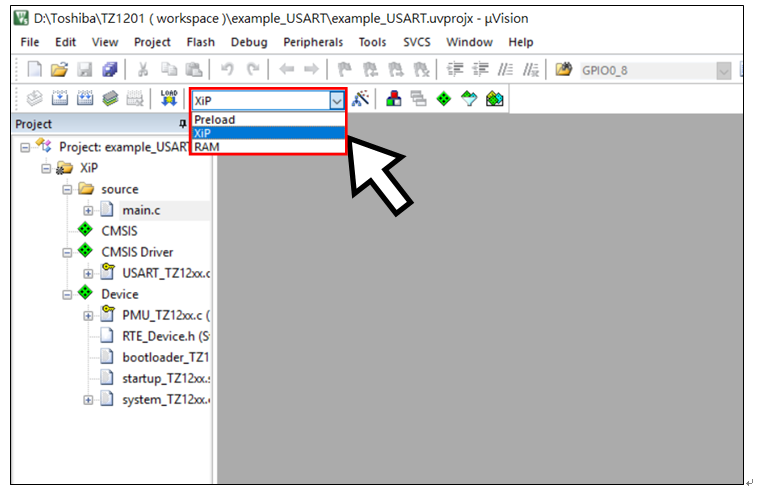
- “Target” variations
You can choose “target” by “Select target” in uVision. Following table shows features of each target.
|
|
XiP |
RAM |
|
Load method |
copied NOR Flash to SRAM |
directly placed onto SRAM by debugger |
|
Load speed |
slow (only 1st time) fast |
middle |
|
Standalone boot |
Yes |
No Debugger required to load program |
- Following figure shows how to select a target
- Click on “Build” icon. μVision builds the software into NOR flash via TZ1200 series.

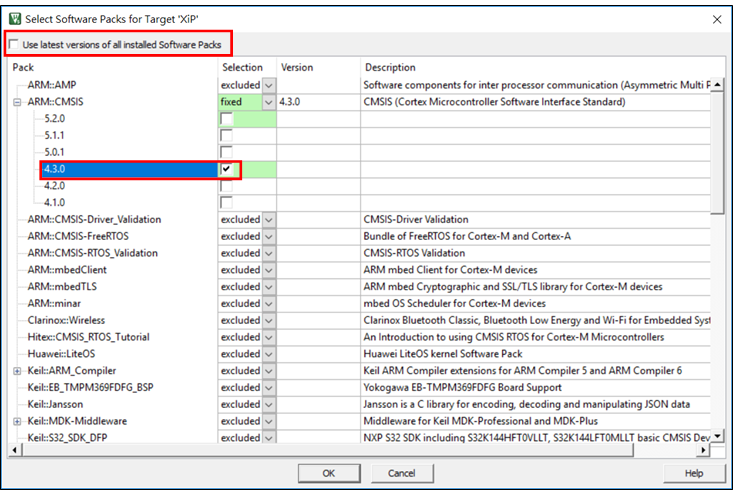
- If get error log, need check “Software packs version”
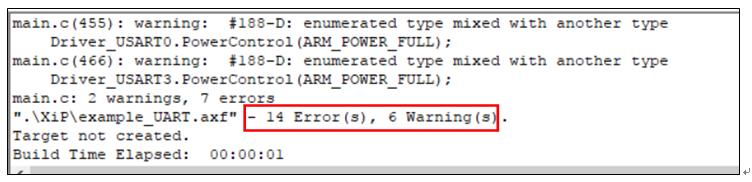
- Uncheck “use latest version of all installed Software Packs” and check “ARM CMSIS 4.3.0”

- Click Download icon to download into FLASH

- First time need select J-link device

- Select Cortex-M4, and click ok.


- When flash load finished, should reboot EBTZ1200-1MA-A1, please push the SYS_RESET button.

- When the program starts, it waits for input from the input pin.

- When an input is made to the input pin(by turning on the SW14), the output value of the output pin is set to 1 for approx.
0.5ms from when an input interrupt occurs. The input interrupt and output writing are output as logs to the serial console.

評論